Take, edit screenshots on Android devices with the S Pen
September 12, 2013 by Mike · Leave a Comment
On Android devices there are a couple of different ways to take screenshots the typical method however, is by pressing the power lock button and home button at the same time. This takes the screenshot and automatically saves it to a folder in the gallery.
Another way to take screen shots on devices equipped with the S Pen. You can use the S Pen to take and edit the screenshot before saving it.
To take a screenshot on an Android device with the S Pen, simply tap the screen with the S Pen for a couple of moments while pressing and holding the S Pen button. You will soon see the screen flash along with the an audio notification tone signally the capture is complete. Once the screen’s been captured, the image will appear with a toolbar of editing tools.

S Pen provides a variety of editing tools. For an example, you can draw or write on the image with different pen tips, erase mistakes, crop the image, and rotate . Once you are happy with your screenshot, tap the ‘Done’ button and it will save automatically to the screenshot gallery.

Capture and Record Video from Apple iPad
May 25, 2010 by Victor · 8 Comments
The new iPad by Apple, a supersized version of the iPod/iPhone, is a tablet computer that features a 9.7″ display with multitouch touch screen technology, running at a resolution of 1024×768.
Recording the entire screen would come in very handy for development, troubleshooting, training videos, demos, podcasts, and even direct broadcasts from the iPad screen.
While a native software solution to iPad screen capture is either weak or nonexistent, there is an ideal and low-cost hardware capture solution that will allow you to capture the entire contents of the screen without slowing down or otherwise altering the functionality of the Apple iPad.
This solution consists of two things: the Apple iPad dock connector to VGA adapter (pictured below), available from the Apple store ($29) and the Epiphan Systems VGA2USB ($299).
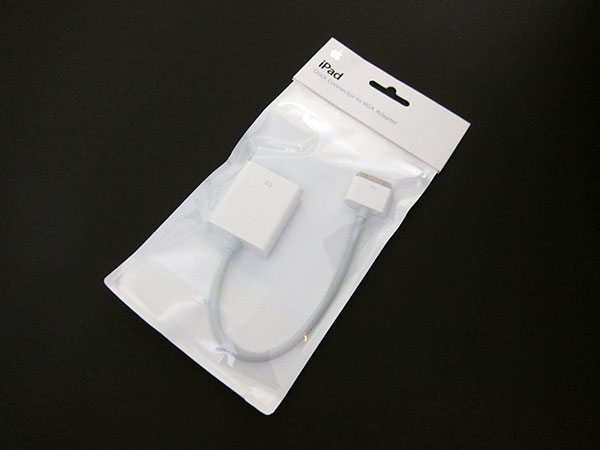
The iPad to VGA dock connector currently allows you to add a VGA port to the Apple iPad and mirror the image on the iPad’s screen on the output. In the future, Apple will add support for applications to use this external output.
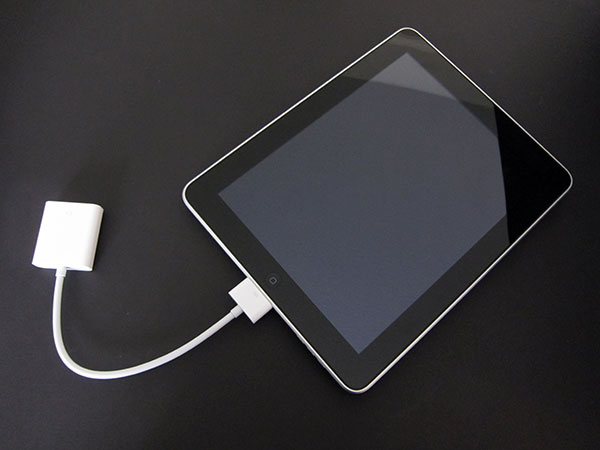
In order to record video from Apple’s iPad, we must begin by connecting the iPad to VGA adapter to the iPad, and connecting the Epiphan Systems VGA2USB to the VGA side of the adapter. A more detailed diagram is shown below:
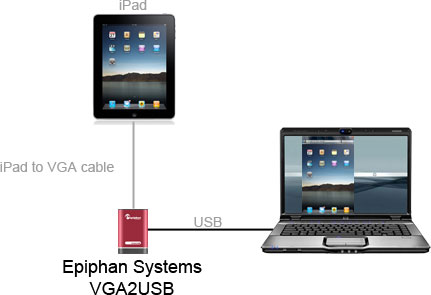
The captured video from the iPad can be recorded on the computer using free software provided by Epiphan Systems, or any other video capture software that supports external devices, such as Adobe Premiere or VirtualDub.
Furthermore, the images and video from the iPad can also be broadcast using software such as Windows Media Encoder or QuickTime Broadcaster.
More information on the VGA2USB can be obtained directly from Epiphan’s website here: http://www.epiphan.com/products/frame-grabbers/vga2usb/
Capturing Video from Nintendo DS
July 7, 2009 by Victor · 8 Comments
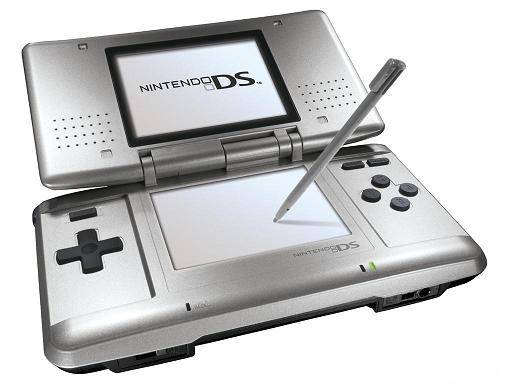
While some portable game systems like the Sony PSP have built-in screen capture, the DS from Nintendo is disadvataged in this respect. There is no simple way of capturing the screen by recording to a file, and the DS does not have a TV-out. This article will review and discuss several ways of recording videos from a Nintendo DS or DS Lite, as well as replicating the DS’ screen on a TV.
TV-out devices
The first way to output your DS’ screen to a monitor or TV is by using a third party TV-out device made specifically for the Nintendo DS. Initially, there were two different models available, but only one is being produced now.
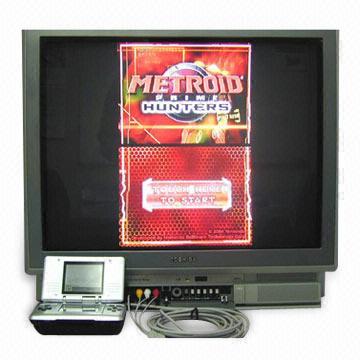
The now discontinued DS to TV adapter was made in Taiwan by Q-Mark. This is the best TV-out device available for the DS, letting you see the output of both LCD screens on a TV. The downside to the Q-Mark device is that the DS has to be modified in order to accomodate the TV adapter, making it bulky and less portable. The Q-Mark device is shown below.
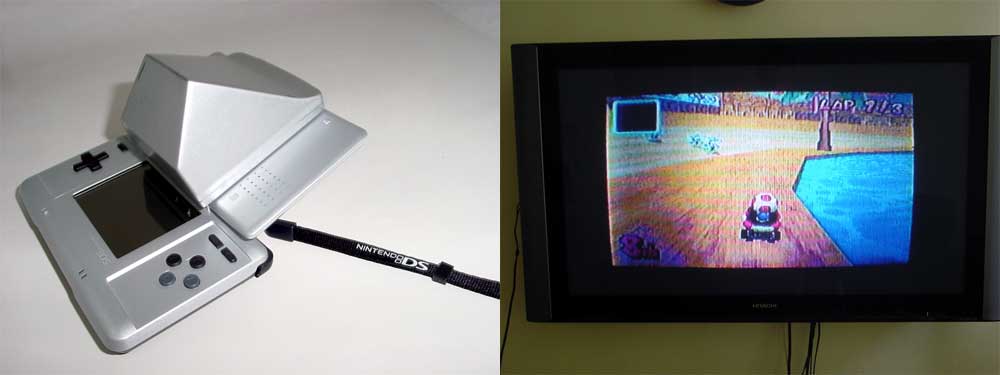
Another screen capture device for the Nintendo DS is the camera-based “Video Game Controller Adapter,” also made by Q-Mark. It can be purchased here and consits of a small device the slips over the upper screen of the DS, pictured below.
The latter device consists basically of a camera that is pointed at your screen, and, because of the way it is attached to the DS, only one screen is visible. Of course, quality is compromised as the camera optics are not of extremely high quality and lighting conditions severely impact this device’s operation.
Either way, if it becomes hard to find the DS to TV adapter and only the camera-based Q-Mark unit is available, it is still tolerable, as long as you intend on playing on one screen only.
Recording and broadcasting video from the Nintendo DS if using TV-out devices
If one of the devices mentioned above is used with the Nintendo DS, and the goal is to capture the video in order to record it, share it on a site like YouTube, or broadcast it, any capture card or video card with Video-in (RCA) will do the trick. YouTube even supports on-the-fly recording, so as long your capture card or video card is set as the webcam device in Windows, and your DS is connected to your capture card via one of the DS-to-TV adapters mentioned above, you’re ready for recording!
For live broadcasts, a variety of software can be used, but we recommend the free Windows Media Encoder. Details on how to use Windows Media Encoder in order to broadcast a video stream from an external device can be found here.
Using an Emulator to Record Gameplay
Using a software emulator on a computer is the cheapest and best way to record gameplay of the Nintendo DS, but is only really suited for short operations and not intended for lengthy game play. An emulator is a software program which replicates the functions of the Nintendo DS. In order to load games to it, you will need to find “ROMs” of each game. Downloading ROMs may be illegal depending on the laws of the country where you live.
Follow this link for a list of free emulators for the Nintendo DS. Once the emulator of your choice is up and running, you must simply capture your screen using either software for screen capture (we have reviewed lots of different programs in our Software as well as News sections) or by connecting a frame grabber to your computer monitor.
Broadcast a VGA Signal over Wi-Fi With Ease
December 16, 2008 by Victor · 2 Comments
A while back, we had an article that featured a device made by IOGear that broadcasts a video signal over Wi-Fi to a VGA output. Now, Epiphan Systems has released a device, the VGA2WiFi, that does almost the exact opposite.
Imagine you are giving a presentation or a lecture and you would like to give your audience real-time instant access to what is being displayed on the conference screen. Normally, you’d have to either prepare slides ahead of time and hand them out ahead of the presentation or make them available later. This might be alright if you are using PowerPoint only, but imagine that you are demonstrating the image from a VGA device that is not a computer, such as an embedded machine, electronic microscope, or medical device.
The VGA2WiFi solves this problem by taking any VGA signal, converting it into a digital image, and broadcasting it over 802.11g Wi-Fi for your audience to view. As long as your viewers have access to any 802.11b/g-enabled device with a web browser, such as a smartphone, PDA, or notebook computer, they are able to view the presentation on their screens as it happens. No additional software needs to be installed.
What’s more, the VGA2WiFi works with signals of up to 1600 x 1200 and broadcasts a true lossless image, meaning that 100% of the source image quality is retained, which is important for environments where a high level of precision is required.
Easily Duplicate a VGA Signal to Anywhere in the World
December 16, 2008 by Victor · Leave a Comment
Gone are the days of WebEx and high-priced license-based collaboration solutions. Epiphan Systems has introduced a simple yet powerful VGA-based conferencing product for online collaboration and monitor synchronization.
The VGA Bridge, promises to “bridge” the distance gap between two monitors or projectors, whether they be in the rooms next to each-other or accross the world.
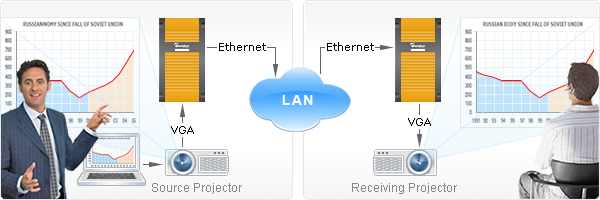
It works by digitizing the analog VGA signal into a compressed digital format that is suitable for web broadcast and then sending it to the receiving VGA Bridge for uncomression and reproduction. While this is not a new concept in the world of web-enabled streaming content, the fact that the VGA Bridge can handle resolutions up to 1600 x 1200 in 100% lossless quality is a first. Of course, you would need a fast and stable Internet or Gigabit LAN connection in order to achieve transfer rates of up to 60 frames per second, but that is to be expected from such as high-end and specialized product.
If web-based collaboration, telemedicine, or remote monitor synchronization are critical to your application, we suggest that you seriously consider the VGA Bridge from Epiphan Systems.
From VGA Source to Printer in One Click
October 31, 2008 by Victor · Leave a Comment
Do you need to print handouts or create hard paper copies directly from your presentation projector, PC, electronic microscope, navigation system, or any other VGA source? Even it today’s digital age, paper copies provide not only and easy way to distribute something (amongst a classroom, for example) but are also much more secure, and often cheaper, than any digital storage medium. For that reason, paper is still the primary method of archiving information in most parts of the world.
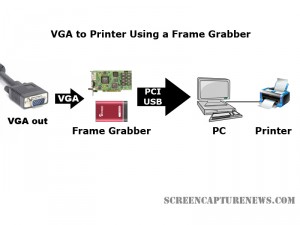
So what exactly do you need to print VGA to paper? There are several alternatives to be looked at. The cheapest, and least reliable, is using a simple VGA frame grabber coupled with a PC and a printer. This is a great alternative for those that already have a computer that is connected to a printer that they can use.
As shown in the diagram above, the VGA source is connected to the frame grabber which is tethered to the PC either through an internal PCI slot or external USB connection. A printer is connected to the computer. This can be a USB, parallel, wireless, or even a network printer. In order to perform the printing action, the user must navigate to the print function in the frame grabber’s software. Before buying a frame grabber, one must make sure that its software has full support for printing.
Since printing to paper does not require high frame rates, pretty much any frame grabber will be able to handle the task at hand. The most cost efficient one, at just under $300, is the Epiphan Systems VGA2USB. While it is not as advanced as the VGA2USB LR that we reviewed, the VGA2USB uses the same software as the VGA2USB LR, meaning that it fully supports printing. Please refer to our frame grabber specification table for complete specifications on the most common VGA and DVI frame grabbers manufactured to date.
Using a Dedicated Device
Imagine you are conducting a presentation and you need to give paper printouts to your audience of something they see on the screen. Suddenly, your computer freezes up and you are no longer able to produce the needed handouts.
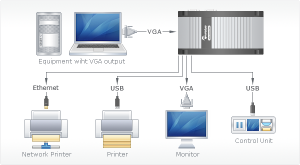
For applications where printing from a VGA source is critical, a stand-alone device is much more reliable and easier to use than the setup described above. One such device is the Epiphan Systems VGA Printer.
The diagram above, taken from Epiphan Systems’ webpage, explains how a the VGA Printer works. Basically, the small VGA Printer replaces the frame grabber and PC entirely. The VGA-in of the VGA printer is connected to the equipment with the VGA output, while the USB or Ethernet is connected to a printer or network printer. The user then has a small control unit which controls when and how many printouts are to be made.
Final Thoughts
If you have any VGA source, whether it be a PC, a server, navigation equipment, or a projector, creating paper copies is easy with the use of frame grabbers or stand-alone dedicated devices. For those on a budget or those that don’t need to print often, the first “frame grabber” method of VGA printing costs only $300 for the frame grabber.
Those that depend on printing from VGA for critical tasks should prepare to shell out $1500 for the VGA Printer, as it is the only stable and reliable solution to converting a VGA video feed into physical paper.
Security Scanner Monitoring and Recording… Made Easy!
September 22, 2008 by Victor · Leave a Comment
Remember the last time you were at the airport? The worst part is going through security and getting your carry-on baggage scanned, then re-scanned, and even possibly checked! This is because, many times, it’s hard for one person monitoring the baggage scanner to be sure that there is nothing suspicious with the luggage in question. Wouldn’t it be better, and safer, if everything was being double-checked by somebody out of sight?
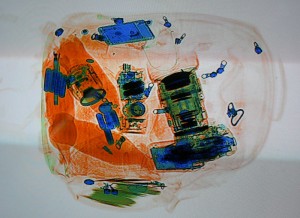
These scanner devices use X-Ray technology, similar to that used in medical applications, to “see through” your bag. The link between the actual security scanner and the monitor that is being used to display the images is, of course, a VGA or DVI signal.
A simple analog video link between the baggage scanner and a monitor placed away from the scanner would not yield enough resolution or quality for proper analysis of the video. A high resolution solution must be implemented in order to transmit a diagnostic quality image, like the one originating from the VGA scanner, to a remote location like a control room.
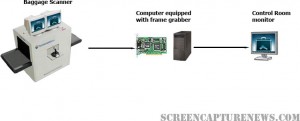
This is where frame grabbers become useful. Using a computer equipped with a frame grabber or a dedicated VGA recording/broadcasting device, the signal can be transmitted in real-time to a control room where someone would be able to review the baggage being scanned. What’s more, if the VGA or DVI signal from the X-Ray Scanner is being recorded, the data can be saved and reviewed, meaning that suspicious luggage can still be checked before the passenger boards his or her flight.
The diagram above shows how a frame grabber-equpped PC can be used to relay the images from the airport X-Ray baggage scanner to a separate monitor in a control room. While the signal between the frame grabber and baggage scanner is VGA or DVI, the link between the computer which is being used to grab the VGA signal and the computer used to output to the control room monitor can be an internet or local network (LAN) link. The computer equipped with the frame grabber can also be used to record and archive all data coming from the scanner.
More common uses of frame grabbers, all of which can be used in this scenario, are described in our “Top 5 Uses for High Resolution Frame Grabbers” article.
Top 5 Uses for High Resolution Frame Grabbers You Should Know About
September 12, 2008 by Victor · Leave a Comment
High resolution frame grabbers are devices that are used to capture the signal from a VGA or DVI stream and convert it into a readable computer format. In other words, frame grabbers take a high resolution video signal and relay it to the memory of the computer as digital data. What you do with that data, however, is entirely up to you. This article will list the top most useful applications for modern high resolution frame grabbers.
1. Archiving Images and Video
This is probably the most common use for frame grabbers today. All high resolution frame grabbers come packaged with an application that allows you to capture the VGA/DVI signal to old fashioned MPEG or AVI video as well as common JPG, BMP, or GIF images. Some applications even have support for live resizing of the captured output in order to decrease file size.
As well, if the frame grabber has WDM driver or Video4Linux support, the computer sees it as a high resolution camera, meaning that you can use any application, such as Windows Encoder, QuickTime Broadcaster, or Adobe Premiere to capture from your VGA or DVI source. Furthermore, SDKs and APIs released by manufacturers allow one to create custom applications and integrate the frame grabber into existing solutions, therefore automating the archiving proccess.
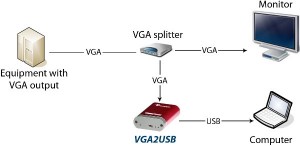
This diagram, taken from the Epiphan Systems website, shows how to use a frame grabber for recording images or video from any device with a VGA output while keeping the device’s monitor. The monitor can be omitted if the user does not need to view the output from the device.
2. Broadcasting
Broadcasting isn’t exactly the first thing that comes to mind when you are thinking of frame grabbers. It is, however, one of the top uses for high resolution frame grabbers. You may not know it, but pretty much all manufacturers that sell boxes for broadcasting a high resolution video signals have integrated frame grabbers inside their devices.
In fact, you can build an equivalent to one of these video/VGA/DVI broadcasting boxes yourself at a fraction of the cost by combining any high resolution frame grabber with a PC. As an example, this process is described in the “Broadcasting” section of our Epiphan Systems VGA2USB LR review.
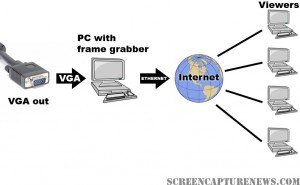
The simple diagram above explains how the broadcasting process works with a frame grabber. The VGA signal is digitized in real-time using the PC with PCI or USB frame grabber. Then, using webcast programs such as Wirecast, Windows Encoder 9, or QuickTime broadcaster, the digitized real-time video from the frame grabber is relayed over the internet to viewers worldwide.
3. Printing
This is an example of combining a technology that has been around for as long as computers existed (digital printing) with a fairly recent technology (frame grabbers). Why would you want to print to paper from the VGA or DVI output of a device? Often, a “hard copy” provides to be the most secure way of storing something.
Consider a situation where you are giving a presentation and would like to produce handouts for everyone on the spot. Wouldn’t it be great if you could just press a button and the contents of your screen got printed right away? Some manufacturers provide this feature in their software, while others (primarily Epiphan Systems) go as far as separate stand-alone devices dedicated to printing from a VGA screen.
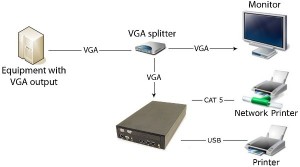
The diagram above, taken from the Epiphan Systems website, shows how a frame grabber based VGA printer is connected to the source device. The VGA printer, shown in a black enclosure, can be replaced with a PC and frame grabber combination.
4. Web Conferencing
Distance collaboration forms the basis of many partnerships in today’s complex business environment. Several characteristics define a good web conferencing solution – reliability, ease of use, effectiveness.
Pairing a frame grabber with your conferencing software of choice can give you these three characteristics and more. Solutions like WebEx allow the user to share his or her webcam. Since most frame grabbers register as a high-resolution camera in Windows and Mac OS X, the user can simply point the program to transmit images from the frame grabber instead of from a webcam. This can be extremely useful when you want to share images from an external source other than the computer being used for the web conference. This can include anything from X-Ray imagery, live ultrasound scans or live GPS info to relaying live screenshots from a server or computer.
Epiphan Systems makes the VGA2WEB, which is a one-of-a-kind web conferecing solution with the primary goal of sharing a VGA signal. If VGA signal broadcasting and conferencing is critical to your application, then this may be a product you should seriously consider.
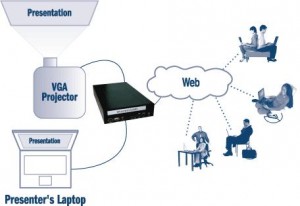
This diagram, taken from Epiphan Systems, shows how a presentation is broadcast in real-time to viewers on the web. The setup for web conferencing is identical to the setup for broadcasting. In the case of conferencing however, the user has a medium in which he/she can give feedback to the presenter.
5. Monitoring of Critical Systems
Most of today’s IT equipment has VGA or DVI outputs, many of which need to be monitored as they are critical to the functions of the organization which they support. Traditional methods of using VNC, converting the VGA to composite video, or having a separate monitor for each output have proven to be not only costly, but also not very reliable.
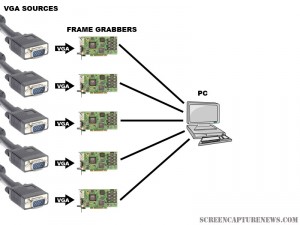
Unlike substitute solutions, high resolution frame grabbers are very scalable, meaning that many of them can be installed on one computer with one monitor output that will be used for central monitoring. Frame grabbers can also be mounted into a rackmount system and you will find that some manufacturers are ready to custom-build a rackmount frame grabber for you.
In the diagram above, several frame grabbers, each of which are connected to separate VGA sources, are attached to one computer. This computer displays the output from each VGA source on one monitor. As well, the computer can record, broadcast, or print from each of the sources in real time.
Online applet allows users to share their screens for free
The market is full of applications designed to share, webcast, or broadcast a user’s computer screen over the web. What separates this application apart from the competition is that it’s a web-based applet. Vyew (pronounced “view”) is compatible with all recent browsers (Internet Explorer, Firefox, Safari etc) and platforms (Windows, Mac or Linux). All that the user needs in order to use this application is Java and Flash installed on their PC.
Vyew is a great altenative to programs like PCAnywhere, TightVNC, that require you to install software on the source and target computers. What’s more, the free version of Vyew does not require you to sign in to the website, allowing the user to initiate the entire desktop sharing proccess in a matter of seconds.
Usability
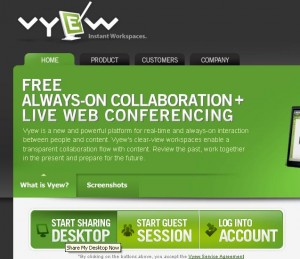
Operation of the Vyew applet is extremely simple. Start by going to Vyew.com. From there, click on “Start Sharing Desktop.”
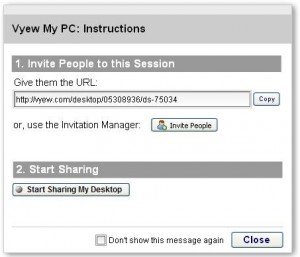
Save the URL that is given to you and give it to all those that you would like to share your screen with. This is the address that your viewers will use in order to log into your Vyew session. Now click on “start sharing my desktop”.
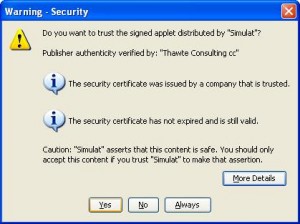
You will get a warning for allowing the applet access to your computer. Press “Yes”.
Now when any of your viewers enter the URL that was supplied to you before the webcast was started, they will see everything that you are doing on your desktop in real time. The viewers can chat with the broadcaster by clicking on the little tab visible on the left side of their screen.
Quality
Vyew tracks the cursor of the source machine, and this is the reason why all cursor movements are very fast and accurate. The free version of Vyew is only able to perform screen capture at a rate of about 1-2 frames per second, thus everything on the screen of the viewer is visibly slow. The person sharing must always rembember this and avoid doing things so fast that the Vyew refresh rate cannot keep up.
The resolution, picture quality, and sharpness in Vyew is very good. Even fine print is perfectly readable and all images are still fairly sharp.
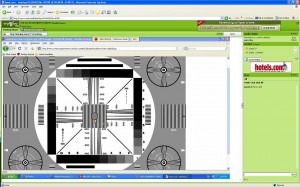
Here you can see a resolution chart that was broadcast to a remote user through Vyew. It is still sharp and retains most of its’ quality. This is great for not just general remote desktop sharing, but also showing presentations, spreadsheets, and Word documents.
Conclusion
Overall, Vyew is a pretty impressive web-based application. There are no intrusive advertisements on the Vyew website, which is another pleasant surprise for a free service like this. There is only a small banner ad in the top right corner. All of the free screen sharing sessions go through the Vyew servers over an unencrypted connection and do not offer the user any options to protect their content. Simulat, the company that makes this applet, hopes that some users will subscribe to their pay service, which offers features like encryption, voice and webcam broadcasting, advanced teleconferencing, and archiving.
While it is unfortunate that more advanced features like audio sharing were not included in the free version and that the refresh rate is so slow that only static pictures and text can be broadcast, the functionality and ease of use of Vyew is still pretty impressive for a completely free service. This applet is perfect for those that need to share their desktop only once in a while and without any hassles.
PrintScreen from Windows XP or Vista on a MAC
August 11, 2008 by Victor · 2 Comments
The new generation of Intel-powered Apple computers fully supports Windows XP and Vista through BootCamp. But, due to the fact that the MAC keyboard has less keys than that of its PC counterpart, the indispensable “Print Screen” function, which lets one take a screenshot of the screen, is no longer apparent to the average user.
In order to launch the “PrintScreen” function from a Mac running Windows XP or Windows Vista through BootCamp, including MacBook, MacBook Pro, MacBook Air, Mac Mini, or Mac Pro, you must first verify if the F1-F12 keys on your machine are controlling software or hardware features of the computer. To do this, you must first access the Keyboard tab of the “Boot Camp” icon in the Windows Control Panel and check if the “Use F1-F12 keys to control software” option is selected.
If the option is selected, then the following shortcuts must be used to perform the PrintScreen command in Windows:
Shift + F11 to capture the entire screen
Alt + Shift + F11 to take screenshot of the active window only
If the “Use F1-F12 keys to control software” option is unselected and the F1-F12 keys are used to control hardware features, then the following combination of keys is to be used to perform a printscreen:
Shift + fn + F11 to capture the entire screen
Alt + Shift + fn + F11 to capture a screenshot of the active window only
You have now emulated the PrintScreen key of a PC keyboard on your Mac!


