Capture and Record Video from Apple iPad
May 25, 2010 by Victor · 8 Comments
The new iPad by Apple, a supersized version of the iPod/iPhone, is a tablet computer that features a 9.7″ display with multitouch touch screen technology, running at a resolution of 1024×768.
Recording the entire screen would come in very handy for development, troubleshooting, training videos, demos, podcasts, and even direct broadcasts from the iPad screen.
While a native software solution to iPad screen capture is either weak or nonexistent, there is an ideal and low-cost hardware capture solution that will allow you to capture the entire contents of the screen without slowing down or otherwise altering the functionality of the Apple iPad.
This solution consists of two things: the Apple iPad dock connector to VGA adapter (pictured below), available from the Apple store ($29) and the Epiphan Systems VGA2USB ($299).
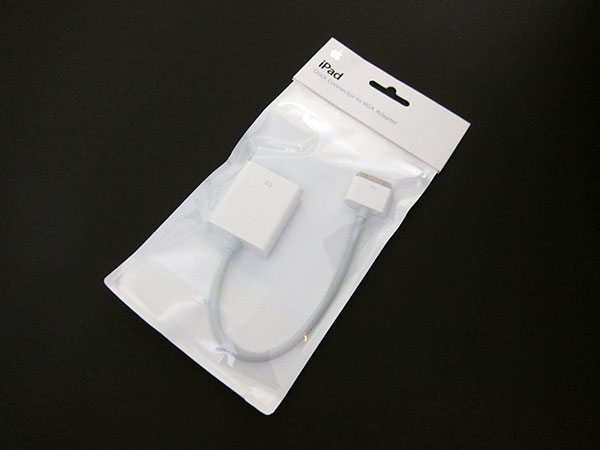
The iPad to VGA dock connector currently allows you to add a VGA port to the Apple iPad and mirror the image on the iPad’s screen on the output. In the future, Apple will add support for applications to use this external output.
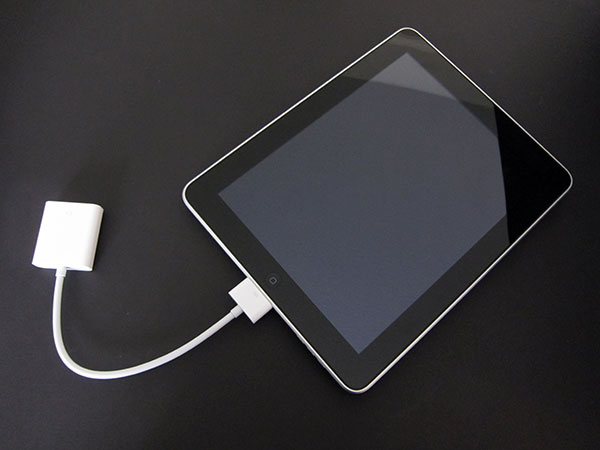
In order to record video from Apple’s iPad, we must begin by connecting the iPad to VGA adapter to the iPad, and connecting the Epiphan Systems VGA2USB to the VGA side of the adapter. A more detailed diagram is shown below:
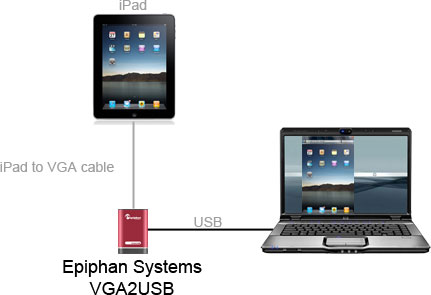
The captured video from the iPad can be recorded on the computer using free software provided by Epiphan Systems, or any other video capture software that supports external devices, such as Adobe Premiere or VirtualDub.
Furthermore, the images and video from the iPad can also be broadcast using software such as Windows Media Encoder or QuickTime Broadcaster.
More information on the VGA2USB can be obtained directly from Epiphan’s website here: http://www.epiphan.com/products/frame-grabbers/vga2usb/
Capturing Video from Nintendo DS
July 7, 2009 by Victor · 8 Comments
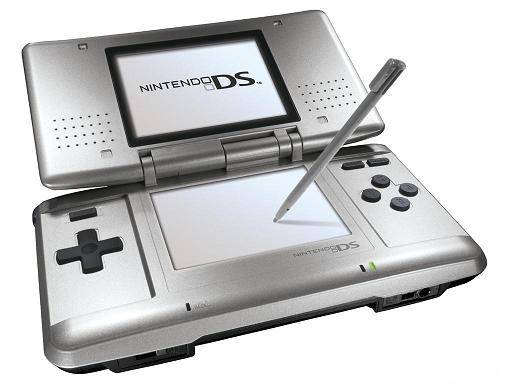
While some portable game systems like the Sony PSP have built-in screen capture, the DS from Nintendo is disadvataged in this respect. There is no simple way of capturing the screen by recording to a file, and the DS does not have a TV-out. This article will review and discuss several ways of recording videos from a Nintendo DS or DS Lite, as well as replicating the DS’ screen on a TV.
TV-out devices
The first way to output your DS’ screen to a monitor or TV is by using a third party TV-out device made specifically for the Nintendo DS. Initially, there were two different models available, but only one is being produced now.
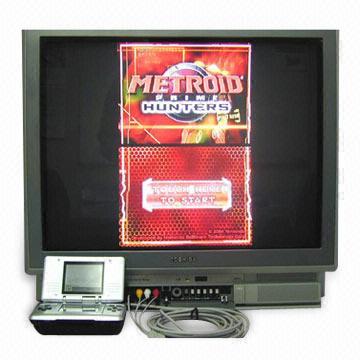
The now discontinued DS to TV adapter was made in Taiwan by Q-Mark. This is the best TV-out device available for the DS, letting you see the output of both LCD screens on a TV. The downside to the Q-Mark device is that the DS has to be modified in order to accomodate the TV adapter, making it bulky and less portable. The Q-Mark device is shown below.
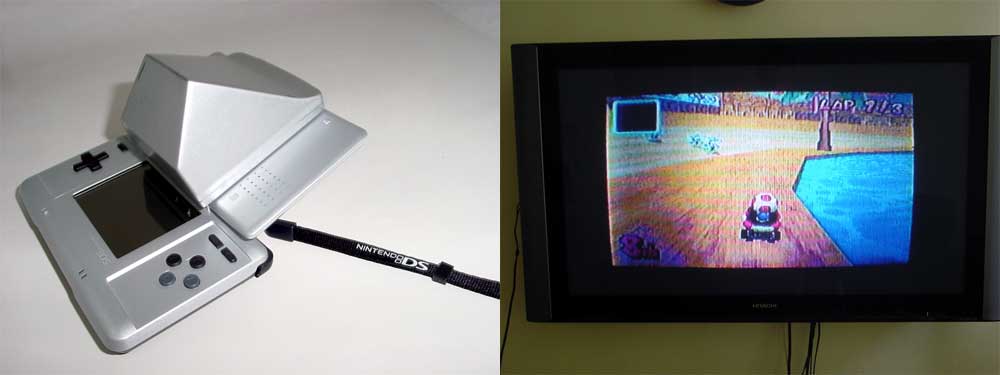
Another screen capture device for the Nintendo DS is the camera-based “Video Game Controller Adapter,” also made by Q-Mark. It can be purchased here and consits of a small device the slips over the upper screen of the DS, pictured below.
The latter device consists basically of a camera that is pointed at your screen, and, because of the way it is attached to the DS, only one screen is visible. Of course, quality is compromised as the camera optics are not of extremely high quality and lighting conditions severely impact this device’s operation.
Either way, if it becomes hard to find the DS to TV adapter and only the camera-based Q-Mark unit is available, it is still tolerable, as long as you intend on playing on one screen only.
Recording and broadcasting video from the Nintendo DS if using TV-out devices
If one of the devices mentioned above is used with the Nintendo DS, and the goal is to capture the video in order to record it, share it on a site like YouTube, or broadcast it, any capture card or video card with Video-in (RCA) will do the trick. YouTube even supports on-the-fly recording, so as long your capture card or video card is set as the webcam device in Windows, and your DS is connected to your capture card via one of the DS-to-TV adapters mentioned above, you’re ready for recording!
For live broadcasts, a variety of software can be used, but we recommend the free Windows Media Encoder. Details on how to use Windows Media Encoder in order to broadcast a video stream from an external device can be found here.
Using an Emulator to Record Gameplay
Using a software emulator on a computer is the cheapest and best way to record gameplay of the Nintendo DS, but is only really suited for short operations and not intended for lengthy game play. An emulator is a software program which replicates the functions of the Nintendo DS. In order to load games to it, you will need to find “ROMs” of each game. Downloading ROMs may be illegal depending on the laws of the country where you live.
Follow this link for a list of free emulators for the Nintendo DS. Once the emulator of your choice is up and running, you must simply capture your screen using either software for screen capture (we have reviewed lots of different programs in our Software as well as News sections) or by connecting a frame grabber to your computer monitor.
Screen Capture, Recording, and Broadcasting with Windows Media Encoder
Do you want to use your frame grabber, screen grabber or webcam with Windows Media Encoder to record or broadcast video? If yes, then this article will help you understand the ins and outs of working with Windows Media Encoder 9 Series and get the most out of this valuable tool.
Windows Media Encoder may be downloaded free of charge at the following address: http://www.microsoft.com/windows/windowsmedia/forpros/encoder/default.mspx. The software may be used with Windows 2000, Windows XP, and Windows Vista.
In this article, a simple VGA frame grabber, the VGA2USB, will be used to broadcast and record the screen of another computer.
Configuring Windows Media Encoder (WM Encoder) for VGA or DVI Broadcast and Recording
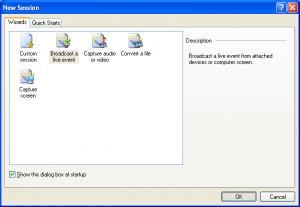
1. Open WM Encoder. The new session wizard should immediately appear. If you would like to broadcast AND record/archive at the same time or just broadcast the VGA or DVI output, select “Broadcast a live event”. If you would to record without broadcasting, select “Capture video or audio”. Click on OK.
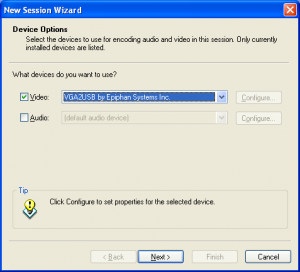
2. You will now be brought to a screen within which you can select whether you would like to record video and/or audio, and from which devices. In this example, we will record just the video output from the Epiphan Systems VGA2USB, which is a low-cost external USB frame grabber. If the frame grabber is connected but not appearing in “video” list of devices, it may be because it does not support 3rd party software or the drivers are not installed properly.
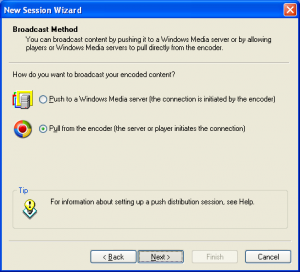
3. Now that you’ve configured which devices you’d like to capture from, the network and connection settings must be selected. In the Broadcast Method step, you must indicate whether you are planning to use an external Windows Media Server to broadcast your video, or if you want to simply use your computer. For simplicity, we will use our own computer. Thus, “pull from encoder” must be selected.
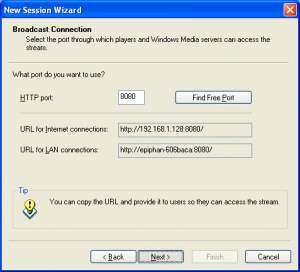
4. You must now select the network port that your broadcast is going to be sent through. If you are not sure which ports are free on your computer, simply click on “Find Free Port”. VERY IMPORTANT: Write down the 2 URLs that are given to you in this step. You will need them later in order to give to your viewers so that they can access the webcast.
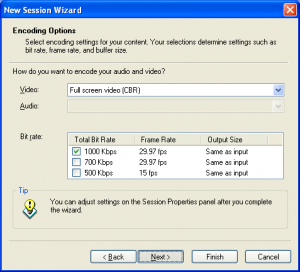
5. Now you need to select the bandwidth/quality for your webcast. This depends on how much of your internet connection you want to consume for the webcast, but 700Kbps+ seems to be the norm these days for average quality video.
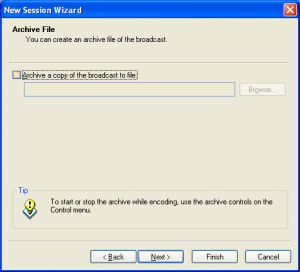
6. In the Archive File step, you may select a location on your local hard drive to save the broadcast to. That way, you may access it (and even re-broadcast it) at any time after the original broadcast has been made.
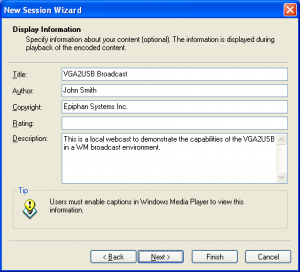
7. Here, you may put some details and copyright information about your broadcast. Your viewers will be able to see this information as it will appear if they click on “file properties” from their media player.
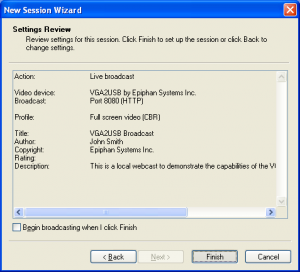
8. That’s it! You have now configured your first Windows Media Encoder VGA or DVI broadcast! Click on “Finish” to complete the wizard.
FAQ
How can my viewers open my webcast?
Your viewers can find your webcast by going to the address that was provided for you in step 4.
I gave the address to my viewers but they still cannot access the broadcast.
Are you behind a local firewall, switch or router? Disable any firewalls that might be blocking the communication between you and the client machine. If you are on a home/business network and want to broadcast to the Internet or outside of your LAN, then you must setup port forwarding to your computer on the router. This is done by going into the router’s control panel and forwarding the HTTP port provided in step 4 to your machine.
My video has both high frame rate and bandwidth settings, but is still not of sufficient quality.
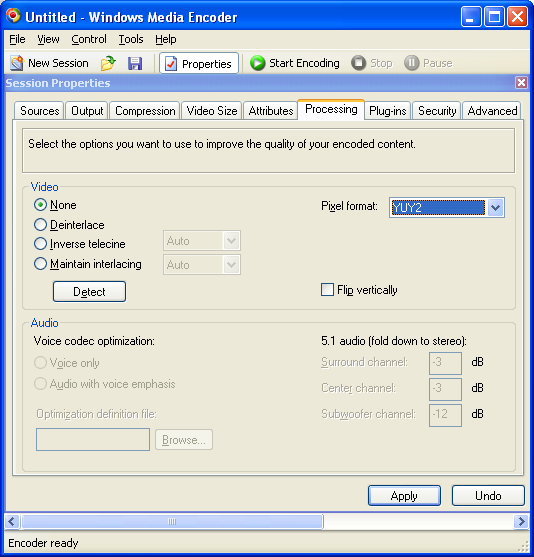
You might have to modify the video processing options. Stop your recording and click on the “Properties” button that is located at the top of the main WM Encoder window. From there, navigate over to the “Processing” tab and select “YUY2″ as the pixel format.
Emulate a screen capture card on your computer… for free!
September 2, 2008 by Victor · Leave a Comment
Have you ever wanted to use your video capture software of choice for creating screen captures, broadcasting live from your screen, or creating videos? Are you a software developer that would like to integrate screen capture into your software package? If your answer to one of these questions is “yes” then we have a solution for you… for free!
The solution is to use a free tiny (<1MB) utility called VH Screen Capture Driver by Hmelyoff Labs. VH Screen Capture driver works by emulating a video capture card in your Windows system, with the output being that of your local monitor. Think of it as a software-based frame grabber that works on Windows machines only. However, do not think of this software as complete replacement to frame grabbers, as it has many major disadvantages over its’ hardware counterparts.
First of all, the screen capture driver uses up a vast amount of system resources, meaning that more advanced applications will not have good capture quality, whereas a frame grabber uses its’ own resources only and puts no extra load on the system. The VH Screen Capture Driver is also only compatible with Windows machines and, being a DirectShow filter, will not work with all applications. A frame grabber however, is compatible with any VGA or DVI output, whether it be from a MAC, Windows machine, high-resolution navigational equipment, etc. Thus, VH Screen Capture is good as a free solution but in no way can this software match all of the advantages that frame grabbers entail.
Technically, however, VH Screen Capture Driver is a DirectShow filter and is compatible with applications that use DirectShow to display content on the user’s screen. The output frame rate does depend on which application is being captured and the system load.
In short, VH Screen Capture Driver allows the user to use popular video capture and broadcast applications, such as Windows Media Encoder and Adobe Premiere, without native screen capture support to grab the image off of their screen.
Using VH Screen Capture Driver
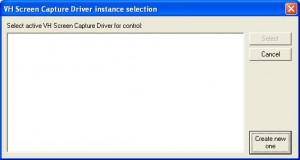
Step 1: Install the program and run it. You should immediately see the following screen. Press “create new one” to start a new instance of the capture driver.
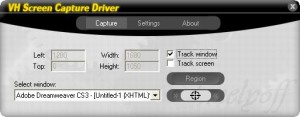
Step 2: You will now see a configuration window. Under the “Capture” tab, you may choose the “Region” option and select only a region of the screen to broadcast. Ticking the “Track window” option enables you to broadcast a single application. You may select it by choosing it from the drop-down list or by clicking on the crosshairs beside the drop-down list and then selecting the application.
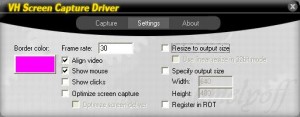
Step 3: Now select the “Settings” tab. Here you can adjust the maximum output frame rate, whether to show your cursor, or whether to compress the screen capture output. If you would like to resize your output in real time, the “Resize to output size” option must be ticked and the output size (Width/Height boxes) must be specified. This is most useful when you are broadcasting to the web and would like to limit the output video resolution in order to use less bandwidth or obtain a smaller file size.
Congratulations! The VH Screen Capture Driver is now configured. Now go to your video capture application of choice, select the “VH Screen Capture Driver” as an input, and start capturing!


