

Greenshot – A Free Open Source Screenshot Tool for Windows
November 10, 2010 by Victor · Leave a Comment
Greenshot is yet another recently released free screenshot tool for windows.

Key features of the Greenshot software include:
- Capture the entire or part of the screen
- Create annotations and highlights
- Save as a file, send to clipboard, or e-mail the captured file
In other words, this software is not much different than other screencap programs that we’ve reviewed. However, Greenshot has one thing that other applications do not – its’ source is released under the open GPL license meaning that this software can be used in a commercial application. Not bad for those that want to include good screen capture/annotation functionality in their custom software.
Greenshot is available for free at www.getgreenshot.org.
Capture and Record Video from Apple iPad
May 25, 2010 by Victor · 8 Comments
The new iPad by Apple, a supersized version of the iPod/iPhone, is a tablet computer that features a 9.7″ display with multitouch touch screen technology, running at a resolution of 1024×768.
Recording the entire screen would come in very handy for development, troubleshooting, training videos, demos, podcasts, and even direct broadcasts from the iPad screen.
While a native software solution to iPad screen capture is either weak or nonexistent, there is an ideal and low-cost hardware capture solution that will allow you to capture the entire contents of the screen without slowing down or otherwise altering the functionality of the Apple iPad.
This solution consists of two things: the Apple iPad dock connector to VGA adapter (pictured below), available from the Apple store ($29) and the Epiphan Systems VGA2USB ($299).

The iPad to VGA dock connector currently allows you to add a VGA port to the Apple iPad and mirror the image on the iPad’s screen on the output. In the future, Apple will add support for applications to use this external output.

In order to record video from Apple’s iPad, we must begin by connecting the iPad to VGA adapter to the iPad, and connecting the Epiphan Systems VGA2USB to the VGA side of the adapter. A more detailed diagram is shown below:

The captured video from the iPad can be recorded on the computer using free software provided by Epiphan Systems, or any other video capture software that supports external devices, such as Adobe Premiere or VirtualDub.
Furthermore, the images and video from the iPad can also be broadcast using software such as Windows Media Encoder or QuickTime Broadcaster.
More information on the VGA2USB can be obtained directly from Epiphan’s website here: http://www.epiphan.com/products/frame-grabbers/vga2usb/
ScreenSnapr: Yet Another Screen Capture Utility Released in Beta
September 8, 2009 by Victor · 2 Comments
If you haven’t picked a favorite screen capture utility, here’s one that you may want to put on your list of apps to try, especially if you want to upload your captures to an FTP server.
ScreenSnapr is a simple screen capture utility. The free version has no expiry date and lacks some of the more interesting features such as posting screenshots to Twitter, something that the full version includes, for a fee of 5$.
Since paying for screen capture applications is nonsense (browse our website to see that there plenty of free apps available), let’s have a look at the features of the free version:
- Unlimited 1-click uploads
- Custom FTP uploads
- URL shrinking
- Custom GUI
- Dual-monitor support
Using ScreenSnapr
ScreenSnapr is launched by a shortcut that is predefined within the program. The program settings are very simple and self-explanatory. FTP settings are easily configured.

A simple window pops up as soon as you create the shortcut. Note that the Tweet option is not functional in the free version of ScreenSnapr.
![]()
Conclusion
ScreenSnapr, while still in beta, is a very simple application with no real features that make it stand out. Even free web-based screen capture tools such as Aviary are more advanced than ScreenSnapr, and do not require a payment to use the full version.
Overall, it’s a nice program if you often upload screenshots to FTP, but otherwise it’s best that you evaluate some other alternatives, many of which are available by browsing this site.
You may read more about and download ScreenSnapr at ScreenSnapr.com.
Epiphan Systems first to announce compatibility with Windows 7
July 31, 2009 by Victor · Leave a Comment
As the Windows 7 Release Candidate was made for free public downloading this week, manufacturers of hardware and software developers were able to test their software and hardware compatibility with Microsoft’s new operating system, slated to hit retail stores in October 2009.
Epiphan Systems, the manufacturer of external frame grabbers, recording, and broadcasting solutions for VGA and DVI has announced that all of its’ devices run smoothly under a Windows 7 environment and that the latest version of their software includes full support for this new operating system.
However, users may encounter some difficulties upon upgrading to this new OS, so it is still recommended that you reinstall the software when upgrading from XP or Windows Vista, as the drivers might not remain after the update.

ScreenCaptureNews will keep you updated as more software and hardware developers announce their products’ compatibility with Windows 7.
Capturing Video from Nintendo DS
July 7, 2009 by Victor · 8 Comments
While some portable game systems like the Sony PSP have built-in screen capture, the DS from Nintendo is disadvataged in this respect. There is no simple way of capturing the screen by recording to a file, and the DS does not have a TV-out. This article will review and discuss several ways of recording videos from a Nintendo DS or DS Lite, as well as replicating the DS’ screen on a TV.

TV-out devices
The first way to output your DS’ screen to a monitor or TV is by using a third party TV-out device made specifically for the Nintendo DS. Initially, there were two different models available, but only one is being produced now.
The now discontinued DS to TV adapter was made in Taiwan by Q-Mark. This is the best TV-out device available for the DS, letting you see the output of both LCD screens on a TV. The downside to the Q-Mark device is that the DS has to be modified in order to accomodate the TV adapter, making it bulky and less portable. The Q-Mark device is shown below.

Another screen capture device for the Nintendo DS is the camera-based “Video Game Controller Adapter,” also made by Q-Mark. It can be purchased here and consits of a small device the slips over the upper screen of the DS, pictured below.

The latter device consists basically of a camera that is pointed at your screen, and, because of the way it is attached to the DS, only one screen is visible. Of course, quality is compromised as the camera optics are not of extremely high quality and lighting conditions severely impact this device’s operation.
Either way, if it becomes hard to find the DS to TV adapter and only the camera-based Q-Mark unit is available, it is still tolerable, as long as you intend on playing on one screen only.
Recording and broadcasting video from the Nintendo DS if using TV-out devices
If one of the devices mentioned above is used with the Nintendo DS, and the goal is to capture the video in order to record it, share it on a site like YouTube, or broadcast it, any capture card or video card with Video-in (RCA) will do the trick. YouTube even supports on-the-fly recording, so as long your capture card or video card is set as the webcam device in Windows, and your DS is connected to your capture card via one of the DS-to-TV adapters mentioned above, you’re ready for recording!
For live broadcasts, a variety of software can be used, but we recommend the free Windows Media Encoder. Details on how to use Windows Media Encoder in order to broadcast a video stream from an external device can be found here.
Using an Emulator to Record Gameplay
Using a software emulator on a computer is the cheapest and best way to record gameplay of the Nintendo DS, but is only really suited for short operations and not intended for lengthy game play. An emulator is a software program which replicates the functions of the Nintendo DS. In order to load games to it, you will need to find “ROMs” of each game. Downloading ROMs may be illegal depending on the laws of the country where you live.
Follow this link for a list of free emulators for the Nintendo DS. Once the emulator of your choice is up and running, you must simply capture your screen using either software for screen capture (we have reviewed lots of different programs in our Software as well as News sections) or by connecting a frame grabber to your computer monitor.
An Awesome New Tool for Web Based Webpage Screenshots and Annotations
July 6, 2009 by Victor · 2 Comments
Here at ScreenCaptureNews, when it comes to software, we like everything that’s free, useful, and simple. A good example of an application that abides by those three rules would be Aviary. Think of Aviary as a tool for capturing screenshots of webpages, similar to FireShot, which we earlier reviewed.
How it works
The way it works is quite simple, just place www.aviary.com/ before the URL of the webpage that you would like to capture.
Once that is done, you will be taken to a loading page, it means that your capture was successful and the Aviary image editor is starting.

You will then be taken to a full-blown image editor, as pictured below. The features are pretty self explanatory. Once you are done editing, you may click on “save to desktop” or “save & host online,” depending on what you would like to do with your saved capture.

Advanced Screenshot Editor
The most amazing feature of Aviary is, by far, the advanced editor, pictured below. It can be accessed by clicking on “Advanced Editor” in the top right of the window.

Those that work with Photoshop will have an easy time adapting to the advanced image editor, which tries to replicate the Photoshop interface and functions with some features like layers, history, magic wand, smudge tool, liquify tool, freeform selection tool, and more. All these features definitely make this web based applet more advanced than most free screenshot editors which need to be installed. What’s more, Aviary works with all operating systems including Windows, Mac OS and Linux, and allows for direct uploading of an image to the Aviary web servers, where you can share it with others.
Conclusion
If you don’t have a webpage screenshot editing tool that you’re used to, or if you’re looking to try something new, I would definitely recommend Aviary. It’s easy to use, it’s free, and it’s packed with features that you won’t find anywhere else!
ScreenCastle Makes Web-Based Screen Capturing Easier Than Easy
A good amount of free web-based screen capture solutions exist today, many of which we regularily review on this site. Today, however, ScreenCastle a new web-based video capture solution came to my attention.
ScreenCastle is by far the easiest web based applet I’ve used, and it really holds true to its “One Click Screencasting” philosophy. ScreenCastle brings the following features to its users:
- 100% free
- It is possible to record fullscreen or to choose the part of the screen to record
- Unlimited fullscreen resolution recording.
- Audio recording (from primary audio recording device such as computer mic)
- Unlimited video length
- Unlimited maximum number of videos
- No registration
Features like unlimited resolution, length, and number of videos truly make this applet stand out from the crowd. There is also an API provided for developers who would like to integrate this technology into their own websites and applications.
Using ScreenCastle
As soon as you open screencastle.com, you will see the huge red button to the right. That is what needs to be clicked in order to begin the screen capture.

ScreenCastle Main Page
After you click the button, a security warning comes up, you must accept it for the recording to work, as ScreenCastle needs to gain access to your computer. After that, ScreenCastle lets you choose if you would like to record your entire screen or just a part of it. You are also able to record from your mic by ticking the checkbox in the lower bottom of the window. Once you are finished configuring the recorder, the arrow at the bottom must be selected.

ScreenCastle Configuration Window
You will now see a black bar at the top of your screen. Click on “start recording” for the recording to start, and then go back to the top of the screen and select “stop recording,” then “save” in order to save your video. This is where I was disappoined. I attempted to record a minute of HD video and even though it was recorded, the video was unable to proccess, thus making ScreenCastle not all that it is made out to be.
I then went ahead an recorded some simple internet browsing with some standard definition YouTube video (near the end of the video). That didn’t work either. I tried recording 10sec of browsing a text webpage, and although it did get to the uploading step, the video never actually proccessed. I am assuming this is a temporary problem with the site and will be fixed. Once it is, samples of video recordings will be added.
Finally, assuming the uploading and processing does work, ScreenCastle gives you several ways to share your video:
- Link to watch (YouTube-like streaming Flash video)
- HTML embed code
- BBCode (for posting video to forums and message boards)
- Direct link to media file
- Preview images (for linking to video)
Conclusion
ScreenCastle is a great idea, is easy to operate, and seems to work smoothly until you get to the final step. No matter what scenarios and resolutions were thrown at it, ScreenCastle would not let me upload any of my recordings. As such, ScreenCastle’s video recording quality cannot really be judged until that bug is fixed.
New free and easy to use screenshot software for Windows XP and Vista
February 25, 2009 by Victor · 4 Comments
We at Screen Capture News like to write about interesting software releases that allow us to do new things in the field of screen capture and recording. Screen Capturer, however, does nothing but the most simple operations, and we like that too. If you are still saving a lot of screenshots using the traditional PrintScreen button method, you’d know how annoying it is to open up an image editing application each time that you want to transfer it from a clipboard to a file (in Windows XP).
Screen Capturer is a 100% free application that is launched automatically whenever you press your PrintScreen button.

Screen Capturer allows you to:
- Capture your entire screen, part of the screen, or a window on your screen.
- Create an image file out of the screen capture in many formats, including BMP, JPG, GIF, PNG and TIFF.
- Capture a video of your screen activity in .WMV (Windows Video) format.
- Send the captured image or video directly to the Windows clipboard, an Image/Video file, e-mail, or to print from the printer.
Of course, this program isn’t going to give you advanced editing or annotation functionality or provide you with many more options than what is listed above. Sometimes, however, all you need to get the task done is something simple, and Screen Capturer does that job perfectly.
EDITORS NOTE (27/10/2009): It looks like the program is no longer offered for free. Please have a look at our Software section for more similar free solutions.
ScreenToaster 2.0 Released
January 14, 2009 by Victor · Leave a Comment
ScreenToaster is probably the most exciting, easy-to-use, and feature packed free screen capture applet available. Today, the developers of ScreenToaster have announced that the Beta testing is over and that ScreenToaster 2.0 is available with the following new features:
- Live audio capture
– Embed webcam in screen capture
– Accelerated or slow-motion playback
– Pauses during recording
– Download the completed screencast (experimental)
– Redesign and improved content organization
– Personal profiles
The devs over at ScreenToaster are also promising an API and direct uploads to video sharing sites like YouTube, Veoh, DailyMotion, and others. If these features will be added, then ScreenToaster will be hands down the best free screen capture application available.
You can read our review of the ScreenToaster beta by following this link.
New Web-Based Screen Capture Utility Now in Beta
October 27, 2008 by Victor · 3 Comments
Here at ScreenCaptureNews, we like all things that are simple to use and don’t cost an arm and a leg. ScreenToaster is a completely free exciting new web-based Java applet similar to ScreenCast-O-Matic. You can read our full review of ScreenCast-O-Matic here. While ScreenCast-O-Matic was an easy applet to use, we did find some problems, notably the ultra-low capture rate (~2fps), that took away from the usefulness of this application.
ScreenToaster is basically an online applet that records your screen or an area of your screen and then instantly publishes the recording to the web in Flash YouTube-like format for you to share with your peers or co-workers. This can come in extremely useful in situations where you need to demonstrate to someone how to use a piece of software, create instructional videos, or upload a video of your screen for others to see for troubleshooting purposes.
While ScreenToaster is still in Beta, you will need an activation key to use it. The activation key can be requested by going to the registration page of the ScreenToaster website. Once you have registered your user account and logged in, ScreenToaster will bring you to your control panel. From here, you will need to press “Start Recording” to launch the recording proccess. You will also be prompted to install the ScreenToaster Java applet, which you must accept.

Once you have clicked on “Start Recording,” ScreenToaster will display a small info box which explains how the software works. It is rediculously easy to understand and use. First, you must bring forward the application which you would like to record. Then, pressing “ALT + S” begins a recording of your entire screen, whereas “ALT + SHIFT + S” allows you to select an area of your screen to record. Finally, once you are done recording, “ALT + S” must be pressed again in order to publish the video.

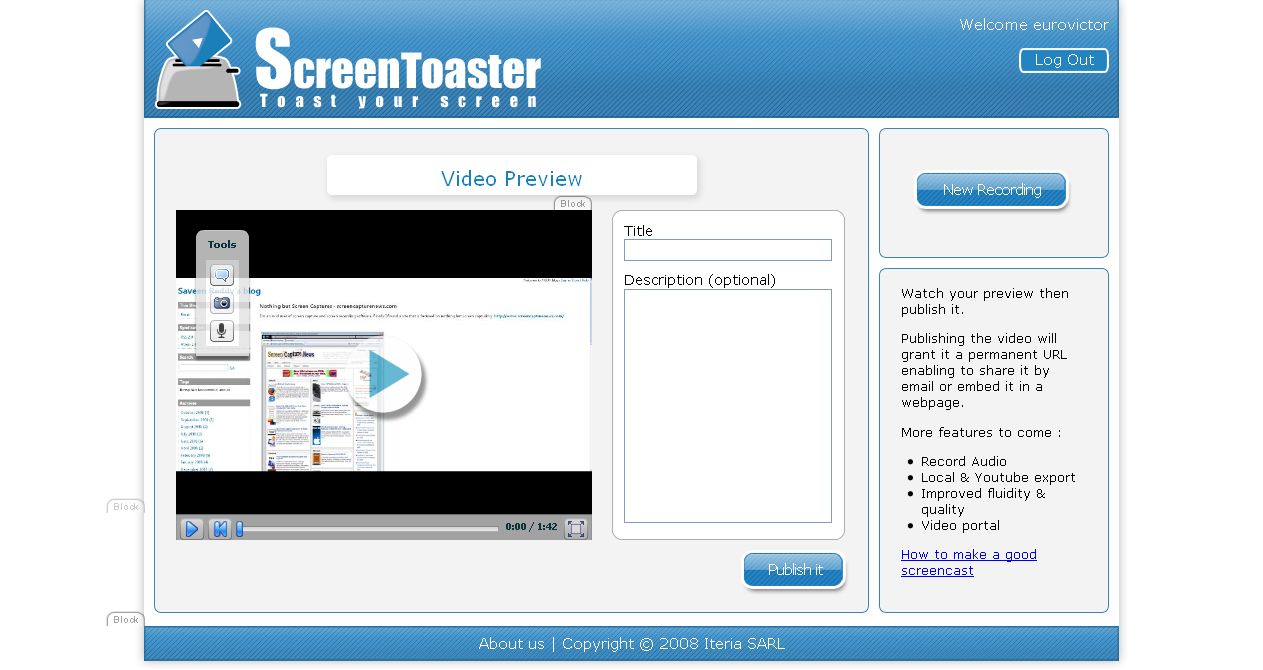
Once you have finished recording (after pressing ALT – S), you will be taken back to the ScreenToaster control panel where you’ll be able to see your recording.

Using the three options on the left side of the video preview, you can add subtitles, audio, or change the preview shot of the video.
You must now name and describe your video. When you are done, click on “Publish”
Unfortunately, we at ScreenCaptureNews were unable to publish any videos due to the fact that it gave us an error every time that we hit “Publish”. The developers of the software wrote to us and said that, because the software is still in beta, bugs do pop up from time to time.
What we saw in the preview, however, was fairly decent. The frame rate was pretty good and it even recorded a video off of YouTube at about 20fps, which is a ten-fold difference between ScreenCast-O-Matic. ScreenToaster was also exceptionally easy to use and overall is a promising web applet.
The developers of ScreenToaster claim that the application works with Windows, Mac OS X, and Linux. ScreenToaster will always be free and will most likely be ad-supported once it is released to the general public. Tentative release date, according to ScreenToaster staff, is “end of October”. We’ll keep you posted with a full review once ScreenToaster is out of beta.

