

Easy Screen-Grab of you Desktop
August 13, 2013 by Mike · Leave a Comment
The straight forward ‘Print Screen’ presents the simply way to grab a whole screen or window however, has it’s limitations. If you have a non-standard keyboard, or simple want to grab a particular area of the screen, you’ll need to resort to a software alternative.
Using Screen Capture tools enables powerful, flexible and intuitive screen-capturing utilities to your system. It enables you to capture anything on the screen including windows, objects, full screen, rectangle regions, freehand-selected regions, and even scrolling windows/web pages.
Many Screen Capture software tools have innovative features such as floating capture panels, hotkeys, resizing, cropping, text annotation, printing, sharing, and more.
Examples of screen capture software are Skitch for MAC and Fast Stone Capture 7.6 for Windows.
An Awesome New Tool for Web Based Webpage Screenshots and Annotations
July 6, 2009 by Victor · 2 Comments
Here at ScreenCaptureNews, when it comes to software, we like everything that’s free, useful, and simple. A good example of an application that abides by those three rules would be Aviary. Think of Aviary as a tool for capturing screenshots of webpages, similar to FireShot, which we earlier reviewed.
How it works
The way it works is quite simple, just place www.aviary.com/ before the URL of the webpage that you would like to capture.
Once that is done, you will be taken to a loading page, it means that your capture was successful and the Aviary image editor is starting.

You will then be taken to a full-blown image editor, as pictured below. The features are pretty self explanatory. Once you are done editing, you may click on “save to desktop” or “save & host online,” depending on what you would like to do with your saved capture.

Advanced Screenshot Editor
The most amazing feature of Aviary is, by far, the advanced editor, pictured below. It can be accessed by clicking on “Advanced Editor” in the top right of the window.

Those that work with Photoshop will have an easy time adapting to the advanced image editor, which tries to replicate the Photoshop interface and functions with some features like layers, history, magic wand, smudge tool, liquify tool, freeform selection tool, and more. All these features definitely make this web based applet more advanced than most free screenshot editors which need to be installed. What’s more, Aviary works with all operating systems including Windows, Mac OS and Linux, and allows for direct uploading of an image to the Aviary web servers, where you can share it with others.
Conclusion
If you don’t have a webpage screenshot editing tool that you’re used to, or if you’re looking to try something new, I would definitely recommend Aviary. It’s easy to use, it’s free, and it’s packed with features that you won’t find anywhere else!
New free and easy to use screenshot software for Windows XP and Vista
February 25, 2009 by Victor · 4 Comments
We at Screen Capture News like to write about interesting software releases that allow us to do new things in the field of screen capture and recording. Screen Capturer, however, does nothing but the most simple operations, and we like that too. If you are still saving a lot of screenshots using the traditional PrintScreen button method, you’d know how annoying it is to open up an image editing application each time that you want to transfer it from a clipboard to a file (in Windows XP).
Screen Capturer is a 100% free application that is launched automatically whenever you press your PrintScreen button.

Screen Capturer allows you to:
- Capture your entire screen, part of the screen, or a window on your screen.
- Create an image file out of the screen capture in many formats, including BMP, JPG, GIF, PNG and TIFF.
- Capture a video of your screen activity in .WMV (Windows Video) format.
- Send the captured image or video directly to the Windows clipboard, an Image/Video file, e-mail, or to print from the printer.
Of course, this program isn’t going to give you advanced editing or annotation functionality or provide you with many more options than what is listed above. Sometimes, however, all you need to get the task done is something simple, and Screen Capturer does that job perfectly.
EDITORS NOTE (27/10/2009): It looks like the program is no longer offered for free. Please have a look at our Software section for more similar free solutions.
ScreenToaster 2.0 Released
January 14, 2009 by Victor · Leave a Comment
ScreenToaster is probably the most exciting, easy-to-use, and feature packed free screen capture applet available. Today, the developers of ScreenToaster have announced that the Beta testing is over and that ScreenToaster 2.0 is available with the following new features:
- Live audio capture
– Embed webcam in screen capture
– Accelerated or slow-motion playback
– Pauses during recording
– Download the completed screencast (experimental)
– Redesign and improved content organization
– Personal profiles
The devs over at ScreenToaster are also promising an API and direct uploads to video sharing sites like YouTube, Veoh, DailyMotion, and others. If these features will be added, then ScreenToaster will be hands down the best free screen capture application available.
You can read our review of the ScreenToaster beta by following this link.
Free Application + Source Code for Capturing Screenshots in Windows Mobile 5
Don’t you ever wish that your PocketPC had a dedicated “Print Screen” button? Unfortunately, screen capture is not present in Windows Mobile 5 and most screen capture applications are not free. Screener, an entirely free Windows Mobile 5 application that weighs in at under 20KB, captures the screen of your PocketPC device and saves it as a .JPG file in your root folder.

In order to take the screenshot, you must first figure out which hardware button on your PocketPC is assigned to the Screener application (it is usually button #2). Then you simply press that button, after which the capture of your screen is saved to your root folder. Simple as that!
New Web-Based Screen Capture Utility Now in Beta
October 27, 2008 by Victor · 3 Comments
Here at ScreenCaptureNews, we like all things that are simple to use and don’t cost an arm and a leg. ScreenToaster is a completely free exciting new web-based Java applet similar to ScreenCast-O-Matic. You can read our full review of ScreenCast-O-Matic here. While ScreenCast-O-Matic was an easy applet to use, we did find some problems, notably the ultra-low capture rate (~2fps), that took away from the usefulness of this application.
ScreenToaster is basically an online applet that records your screen or an area of your screen and then instantly publishes the recording to the web in Flash YouTube-like format for you to share with your peers or co-workers. This can come in extremely useful in situations where you need to demonstrate to someone how to use a piece of software, create instructional videos, or upload a video of your screen for others to see for troubleshooting purposes.
While ScreenToaster is still in Beta, you will need an activation key to use it. The activation key can be requested by going to the registration page of the ScreenToaster website. Once you have registered your user account and logged in, ScreenToaster will bring you to your control panel. From here, you will need to press “Start Recording” to launch the recording proccess. You will also be prompted to install the ScreenToaster Java applet, which you must accept.

Once you have clicked on “Start Recording,” ScreenToaster will display a small info box which explains how the software works. It is rediculously easy to understand and use. First, you must bring forward the application which you would like to record. Then, pressing “ALT + S” begins a recording of your entire screen, whereas “ALT + SHIFT + S” allows you to select an area of your screen to record. Finally, once you are done recording, “ALT + S” must be pressed again in order to publish the video.

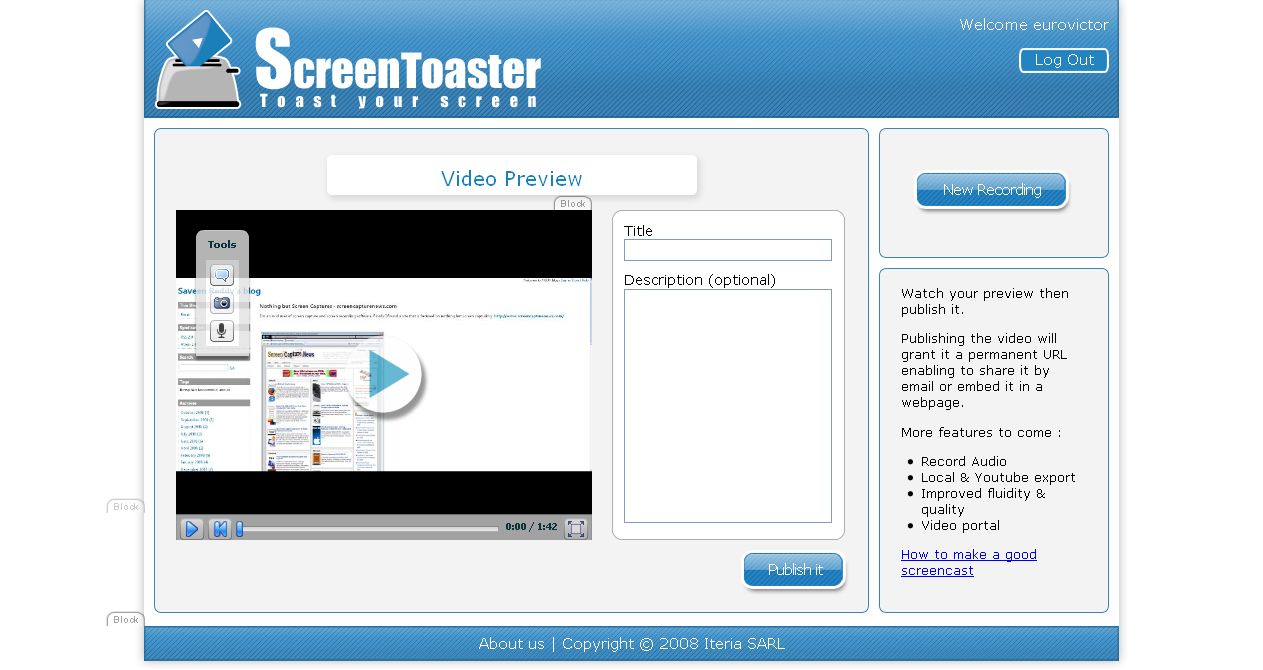
Once you have finished recording (after pressing ALT – S), you will be taken back to the ScreenToaster control panel where you’ll be able to see your recording.

Using the three options on the left side of the video preview, you can add subtitles, audio, or change the preview shot of the video.
You must now name and describe your video. When you are done, click on “Publish”
Unfortunately, we at ScreenCaptureNews were unable to publish any videos due to the fact that it gave us an error every time that we hit “Publish”. The developers of the software wrote to us and said that, because the software is still in beta, bugs do pop up from time to time.
What we saw in the preview, however, was fairly decent. The frame rate was pretty good and it even recorded a video off of YouTube at about 20fps, which is a ten-fold difference between ScreenCast-O-Matic. ScreenToaster was also exceptionally easy to use and overall is a promising web applet.
The developers of ScreenToaster claim that the application works with Windows, Mac OS X, and Linux. ScreenToaster will always be free and will most likely be ad-supported once it is released to the general public. Tentative release date, according to ScreenToaster staff, is “end of October”. We’ll keep you posted with a full review once ScreenToaster is out of beta.
Easily Get RGB, CMYK, an Pixel Color Values With Free Utility
October 1, 2008 by Victor · Leave a Comment
Whether you’re a graphics designer or a basement artist, there are times when you simply see a color on your screen which you want to replicate. For example, let’s say that you’re browsing a website and see a color that you like within a Flash animation and want to grab its’ RGB values so that you can use that color in your own work. Of course, there is always the classic solution of capturing your screen to a file, then extracting the color via PhotoShop.
There is, however, and easier and faster way. A small free utility called Pixel Pick, weighing it an under 400KB in size, lets you see the RGB, HEX, CMYK, HSB, and Pixel values of the exact pixel under the tip of your cursor.
![]()
Pixel Pick does not need to be installed on the computer it is being used on. Just run the .EXE file and the program fires up instantly. This makes this program especially useful if you are on a public computer and absolutely need to know the color values for something that you see on your screen. The program even features a handy magnification function (pictured below) that lets you zoom in on any area of your screen by up to 30X.
![]()
What’s more, Pixel Pick saves your recent viewed colors in a handy panel (accessible by clicking the icon to the right of the magnifying glass) so that you can later access the colors which you were viewing.
![]()
You can download Pixel Pick from the publisher’s website here.
New Online Applet Lets Users Instantly Create Screencasts
Want to capture your screen, create a video of it, post it online, share with your friends, but don’t want to download or buy any software? Want to do all of this with ease yet not pay a cent? Well, now there is a solution! It is called “Screencast-O-Matic” and lets you share and broadcast a recording of your screen for free. This solution is Java-based (requires Java 1.5 installed) and works flawlessly with Internet Explorer, Firefox, and Opera on both Windows and Mac OS. Screencast-O-Matic is also supposed to work with Linux, but it seems like the developers are still working out the final kinks.
Screencast-O-Matic can post screen captures up to 15 minutes in length on their free hosting but it also lets you save the captures as .MOV QuickTime files so you can do whatever you want with your captured content.
Unfortunately, Screencast-O-Matic has some major limitations that make the applet unappealing to some. First of all, it can only capture a maximum resolution of 1024×768 and maintain a capture rate of only 2 frames per second. This is ok for text, but not good if you want to show videos or animations in your screencast. What’s more, Screencast-O-Matic does not have support for dual-monitor systems (it can only capture from your primary monitor). Click here for a sample screencast that we created with Screencast-O-Matic to see for yourself.
Using Screencast-O-Matic
Step 1: Visit http://www.screencast-o-matic.com/ and click on “Create”.

Step 2: You will be prompted to start the Java applet. Click on “Start” at the bottom of the page. A security verification might come up, which you must also allow in order for the applet to start.

Step 3: Once you have allowed the applet access to your computer, you will now see a configuration screen. Unfortunately, Screencast-O-Matic only supports resolutions up to 1024×768, so you must select that option for maximum quality. Screencast-O-Matic also lets you add voice to the video. Once you have configured the options, click on “Go!”

Step 4: At this point, you will see a black frame come up on your screen. It cannot be resized. Drag it over the area which you would like to capture and follow the instructions supplied by Screencast-O-Matic:
- Drag the black frame so it surrounds the area of the screen that you’d like to capture.
- If you are recording audio, make sure the mic level is ok by talking into your mic and watching the
 icon. You may also need to adjust the mic recording volume for your operating system. See examples for Windows XP and Mac OS X.
 - Click the
 button to start recording the part of your screen inside the black frame (and audio from the mic you chose).
 - Click the
 button when you are done (or if you need to pause click
  button).
If you are working on a dual-screen setup, Screencast-O-Matic won’t allow you to capture from your secondary screen.
Step 5: Once you have completed yor capture, you will be able to either upload the video right away or save it on your computer as an .MOV file. If you are uploading your screencast, Screencast-O-Matic will prompt you to register a username and passoword on their website. Screencast-O-Matic will then give you a URL for your upload.

Step 6: You’re done! Now you can share the link that was given to you previously and have people access your screencast. Here is a sample screen capture that we did in-house: http://www.screencast-o-matic.com/watch/cjQvQrnnV
Take Screenshots in Firefox with New Add-on
September 30, 2008 by Victor · Leave a Comment
Have you ever wanted to quickly capture a webpage that you are visiting and save the screenshot or send it in an e-mail? What if you need to share your screenshot online with many users (for example, on an online forum)? Maybe you want to create instructions to show users how to navigate a web page and do not want to spend a fortune on special screen capturing and annotating software like Camtasia. If you answered “yes” to any of the previous questions, then this free add-on to Firefox should be something to be looking into.
The FireShot Add-On for FireFox is 100% free and is compatible with Firefox 2 and Firefox 3. It adds the following functionality to your Firefox browser:
- Instantly upload screen captures to FREE public screenshot hosting
– save screenshots to disk (PNG, GIF, JPEG, BMP)
– print screenshot
– copied to clipboard (similar to PrintScreen button)
– Attach screenshot to e-mail
– Annotate and add text and instructions to screenshot

The image above describes the features of the FireShot add-on screen capture editing and annotation tool. As you can see, the add-on has a good array of features and should be sufficient for any sort of simple editing and annotating.

What’s more, FireShot has the ability to add effects to the captured screenshots. This is especially useful if you would like to emphasize a particular section of a webpage or want to hide part of the webpage from the screenshot (if there is a user name or revealed password, for example).


FireShot is accessible both by right-clicking on the webpage that you are browsing or by clicking on the “S” icon beside the address bar.
FireShot can be downloaded here. This add-on is recommended for anyone that regularly needs to take screenshots from their browser or for those that need to create instructional manuals related to the online world.
Emulate a screen capture card on your computer… for free!
September 2, 2008 by Victor · Leave a Comment
Have you ever wanted to use your video capture software of choice for creating screen captures, broadcasting live from your screen, or creating videos? Are you a software developer that would like to integrate screen capture into your software package? If your answer to one of these questions is “yes” then we have a solution for you… for free!
The solution is to use a free tiny (<1MB) utility called VH Screen Capture Driver by Hmelyoff Labs. VH Screen Capture driver works by emulating a video capture card in your Windows system, with the output being that of your local monitor. Think of it as a software-based frame grabber that works on Windows machines only. However, do not think of this software as complete replacement to frame grabbers, as it has many major disadvantages over its’ hardware counterparts.
First of all, the screen capture driver uses up a vast amount of system resources, meaning that more advanced applications will not have good capture quality, whereas a frame grabber uses its’ own resources only and puts no extra load on the system. The VH Screen Capture Driver is also only compatible with Windows machines and, being a DirectShow filter, will not work with all applications. A frame grabber however, is compatible with any VGA or DVI output, whether it be from a MAC, Windows machine, high-resolution navigational equipment, etc. Thus, VH Screen Capture is good as a free solution but in no way can this software match all of the advantages that frame grabbers entail.
Technically, however, VH Screen Capture Driver is a DirectShow filter and is compatible with applications that use DirectShow to display content on the user’s screen. The output frame rate does depend on which application is being captured and the system load.
In short, VH Screen Capture Driver allows the user to use popular video capture and broadcast applications, such as Windows Media Encoder and Adobe Premiere, without native screen capture support to grab the image off of their screen.
Using VH Screen Capture Driver
Step 1: Install the program and run it. You should immediately see the following screen. Press “create new one” to start a new instance of the capture driver.

Step 2: You will now see a configuration window. Under the “Capture” tab, you may choose the “Region” option and select only a region of the screen to broadcast. Ticking the “Track window” option enables you to broadcast a single application. You may select it by choosing it from the drop-down list or by clicking on the crosshairs beside the drop-down list and then selecting the application.

Step 3: Now select the “Settings” tab. Here you can adjust the maximum output frame rate, whether to show your cursor, or whether to compress the screen capture output. If you would like to resize your output in real time, the “Resize to output size” option must be ticked and the output size (Width/Height boxes) must be specified. This is most useful when you are broadcasting to the web and would like to limit the output video resolution in order to use less bandwidth or obtain a smaller file size.

Congratulations! The VH Screen Capture Driver is now configured. Now go to your video capture application of choice, select the “VH Screen Capture Driver” as an input, and start capturing!

