From VGA Source to Printer in One Click
October 31, 2008 by Victor · Leave a Comment
Do you need to print handouts or create hard paper copies directly from your presentation projector, PC, electronic microscope, navigation system, or any other VGA source? Even it today’s digital age, paper copies provide not only and easy way to distribute something (amongst a classroom, for example) but are also much more secure, and often cheaper, than any digital storage medium. For that reason, paper is still the primary method of archiving information in most parts of the world.
So what exactly do you need to print VGA to paper? There are several alternatives to be looked at. The cheapest, and least reliable, is using a simple VGA frame grabber coupled with a PC and a printer. This is a great alternative for those that already have a computer that is connected to a printer that they can use.
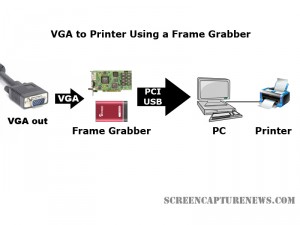
As shown in the diagram above, the VGA source is connected to the frame grabber which is tethered to the PC either through an internal PCI slot or external USB connection. A printer is connected to the computer. This can be a USB, parallel, wireless, or even a network printer. In order to perform the printing action, the user must navigate to the print function in the frame grabber’s software. Before buying a frame grabber, one must make sure that its software has full support for printing.
Since printing to paper does not require high frame rates, pretty much any frame grabber will be able to handle the task at hand. The most cost efficient one, at just under $300, is the Epiphan Systems VGA2USB. While it is not as advanced as the VGA2USB LR that we reviewed, the VGA2USB uses the same software as the VGA2USB LR, meaning that it fully supports printing. Please refer to our frame grabber specification table for complete specifications on the most common VGA and DVI frame grabbers manufactured to date.
Using a Dedicated Device
Imagine you are conducting a presentation and you need to give paper printouts to your audience of something they see on the screen. Suddenly, your computer freezes up and you are no longer able to produce the needed handouts.
For applications where printing from a VGA source is critical, a stand-alone device is much more reliable and easier to use than the setup described above. One such device is the Epiphan Systems VGA Printer.
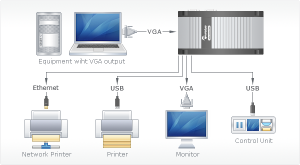
The diagram above, taken from Epiphan Systems’ webpage, explains how a the VGA Printer works. Basically, the small VGA Printer replaces the frame grabber and PC entirely. The VGA-in of the VGA printer is connected to the equipment with the VGA output, while the USB or Ethernet is connected to a printer or network printer. The user then has a small control unit which controls when and how many printouts are to be made.
Final Thoughts
If you have any VGA source, whether it be a PC, a server, navigation equipment, or a projector, creating paper copies is easy with the use of frame grabbers or stand-alone dedicated devices. For those on a budget or those that don’t need to print often, the first “frame grabber” method of VGA printing costs only $300 for the frame grabber.
Those that depend on printing from VGA for critical tasks should prepare to shell out $1500 for the VGA Printer, as it is the only stable and reliable solution to converting a VGA video feed into physical paper.
How to Take Screenshots on your iPhone or iPod Touch
As long as you have the 2.0 version of the iPhone firmware or above, the iPhone or iPod Touch does not need any special screen capture software in order to take instant screenshots of your screen. Here is how it works:
1. Hold the Home button down
2. Press the Sleep/Wake button
Your screen should now flash white. This means that the iPhone or iPod Touch has successfully captured your screen and saved it as a photo.
3. Your screenshots can be found by pressing the Photos icon.
On an iPhone, you’d have to then navigate to the Camera Roll folder. On an iPod Touch, the screen captures are saved in the Saved Photos folder.
New Web-Based Screen Capture Utility Now in Beta
October 27, 2008 by Victor · 3 Comments
Here at ScreenCaptureNews, we like all things that are simple to use and don’t cost an arm and a leg. ScreenToaster is a completely free exciting new web-based Java applet similar to ScreenCast-O-Matic. You can read our full review of ScreenCast-O-Matic here. While ScreenCast-O-Matic was an easy applet to use, we did find some problems, notably the ultra-low capture rate (~2fps), that took away from the usefulness of this application.
ScreenToaster is basically an online applet that records your screen or an area of your screen and then instantly publishes the recording to the web in Flash YouTube-like format for you to share with your peers or co-workers. This can come in extremely useful in situations where you need to demonstrate to someone how to use a piece of software, create instructional videos, or upload a video of your screen for others to see for troubleshooting purposes.
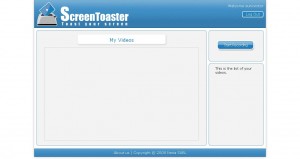
While ScreenToaster is still in Beta, you will need an activation key to use it. The activation key can be requested by going to the registration page of the ScreenToaster website. Once you have registered your user account and logged in, ScreenToaster will bring you to your control panel. From here, you will need to press “Start Recording” to launch the recording proccess. You will also be prompted to install the ScreenToaster Java applet, which you must accept.
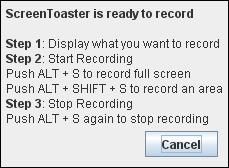
Once you have clicked on “Start Recording,” ScreenToaster will display a small info box which explains how the software works. It is rediculously easy to understand and use. First, you must bring forward the application which you would like to record. Then, pressing “ALT + S” begins a recording of your entire screen, whereas “ALT + SHIFT + S” allows you to select an area of your screen to record. Finally, once you are done recording, “ALT + S” must be pressed again in order to publish the video.
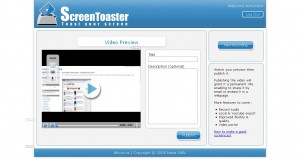
Once you have finished recording (after pressing ALT – S), you will be taken back to the ScreenToaster control panel where you’ll be able to see your recording.
Using the three options on the left side of the video preview, you can add subtitles, audio, or change the preview shot of the video.
You must now name and describe your video. When you are done, click on “Publish”
Unfortunately, we at ScreenCaptureNews were unable to publish any videos due to the fact that it gave us an error every time that we hit “Publish”. The developers of the software wrote to us and said that, because the software is still in beta, bugs do pop up from time to time.
What we saw in the preview, however, was fairly decent. The frame rate was pretty good and it even recorded a video off of YouTube at about 20fps, which is a ten-fold difference between ScreenCast-O-Matic. ScreenToaster was also exceptionally easy to use and overall is a promising web applet.
The developers of ScreenToaster claim that the application works with Windows, Mac OS X, and Linux. ScreenToaster will always be free and will most likely be ad-supported once it is released to the general public. Tentative release date, according to ScreenToaster staff, is “end of October”. We’ll keep you posted with a full review once ScreenToaster is out of beta.


