Take, edit screenshots on Android devices with the S Pen
September 12, 2013 by Mike · Leave a Comment
On Android devices there are a couple of different ways to take screenshots the typical method however, is by pressing the power lock button and home button at the same time. This takes the screenshot and automatically saves it to a folder in the gallery.
Another way to take screen shots on devices equipped with the S Pen. You can use the S Pen to take and edit the screenshot before saving it.
To take a screenshot on an Android device with the S Pen, simply tap the screen with the S Pen for a couple of moments while pressing and holding the S Pen button. You will soon see the screen flash along with the an audio notification tone signally the capture is complete. Once the screen’s been captured, the image will appear with a toolbar of editing tools.

S Pen provides a variety of editing tools. For an example, you can draw or write on the image with different pen tips, erase mistakes, crop the image, and rotate . Once you are happy with your screenshot, tap the ‘Done’ button and it will save automatically to the screenshot gallery.

Screenshot FX- Capture any image on Mac
August 13, 2013 by Mike · Leave a Comment
OS X has a built-in screen capture function, but it is pretty limited. For example, Command-Shift-4 lets you define a rectangle to capture. Command-Shift-4 followed by the space bar will capture a window. You can also capture your entire desktop with Command-Shift-3, and other commands will save the result to your clipboard.
Sometimes, those basic features are not enough. Apple bundles a utility called Grab with OS X that adds more features, but it still falls short for many users. Enter Screenshot FX, a very handy US$1.99 utility (on sale now) that lets you capture irregular objects by clicking on points and then dragging those points to create a curve.
The app sits in your Menu Bar waiting to be invoked, or you can hit Command-Shift-5 to bring it up. When you have outlined your object, you click on the first point, hit Return and your screenshot is saved to a location you specify in the app’s preferences.
Once your points are selected, you can modify them, or use the arrow keys on your keyboard to fine-tune the selection, either one or four pixels at a time. Any control point can be edited or deleted, giving you a lot of flexibility. The only negative is that all captures are saved as PNG files, the same format Apple uses. I’d like to see an option where I could save as a JPG, TIFF, BMP or GIF.
I tried the app with some difficult shapes, and it worked very well. I did have to refer to the built-in help to learn all the commands and key combinations, but it soon became second nature. In my work for TUAW I am constantly grabbing images like logos or screen shots of apps I am testing, so Screenshot FX is going to be a much-used item. There are similar apps around, like Screenshot Menu, which is free, but you can only draw a rectangle with it. Screenshots ($9.99) is also worth a look, as it has some nice features like sending directly to mail or iPhoto.
Screenshot FX is a handy little utility that I’ll use a lot. If you find yourself needing screenshots, and want more functionality than Apple gives you, this app is just the ticket.
Screenshot FX needs OS X 10.7 or later, and a 64-bit processor.
Greenshot – A Free Open Source Screenshot Tool for Windows
November 10, 2010 by Victor · Leave a Comment
Greenshot is yet another recently released free screenshot tool for windows.

Key features of the Greenshot software include:
- Capture the entire or part of the screen
- Create annotations and highlights
- Save as a file, send to clipboard, or e-mail the captured file
In other words, this software is not much different than other screencap programs that we’ve reviewed. However, Greenshot has one thing that other applications do not – its’ source is released under the open GPL license meaning that this software can be used in a commercial application. Not bad for those that want to include good screen capture/annotation functionality in their custom software.
Greenshot is available for free at www.getgreenshot.org.
Shutter – A Tool for Linux Screenshots
August 15, 2009 by Victor · Leave a Comment
Shutter is a fully-featured screenshot tool for Linux. Within one window, Shutter lets you take a screenshot of the screen, a window, or an area of the screen, edit it, and upload it to the web. Shutter is fully open source and, according to their website, has the following features:
Features:
- take a screenshot of your complete desktop, a rectangular area or capture a website
- take screenshot directly or with a specified delay time
- save the screenshots to a specified directory and name them in a convenient way
(using special wild-cards) - Shutter is fully integrated into the Gnome Desktop (TrayIcon etc.)
- generate thumbnails directly when you are taking a screenshot and set a size level in %
- Shutter session collection
- keep track of all screenshots during session
- copy screeners to clipboard
- print screenshots
- delete screenshots
- rename your file
- upload your files directly to Image-Hosters (e.g. http://ubuntu-pics.de), retrieve all the needed links and share them with others
- edit your screenshots directly using the embedded drawing tool
It works like your standard screen capture program (we review such programs all the time) and does not yet have a video recording feature. The program can be set to run automatically as soon as you press the PrtScn or Alt+PrtScn buttons. Read here about configuring Shutter to activate automatically.
Extended Features/Plugins
One neat thing about Shutter is the support of plugins.

These plugins are able to create effects similar to those in GIMP and PhotoShop but directly in Shutter, making it a nice tool for web developers who want to add effects to images on their website, but either don’t have the expertise or the time to do so. All plugins have a slate of settings to make your image look just the way you want it.

Uploading your Images
Shutter lets you upload your screen captures to a wide variety of free image sharing websites. One of the neatest feature of the upload feature is that you get embed and direct links to the uploaded images right away, without the need to launch a browser.

Conclusion
Shutter is a very powerful and fully-featured tool for capturing still screenshots within a graphical Linux environment. As a matter of fact, it surpasses many of its’ Windows counterparts in features, ease of use, and usability. For more information about Shutter for Linux visit http://shutter-project.org/.
PrintScreen.Me: Extend your PrintScreen Functionality
July 24, 2009 by Victor · Leave a Comment
Are you a frequent user of the PrintScreen key? Ever wanted to get more out of that button? Sure, you can paste from the PrintScreen clipboard to any image editing or annotation program of your choice, but now there is a free alternative that extends the PrintScreen button’s functionality and makes it easy to create annotated screenshots and upload them right away to an image sharing site of your work. PrintScreen.Me works in four easy steps:
- Capture your screen with the PrintScreen button
- Annotate, draw, and add notes to your screen capture
- Upload screenshot directly to Facebook, Twitter, Picasaweb, Flickr, or PrintScreen.Me’s free image server.
- E-mail, print, or archive the screen capture.
Using PrintScreen.ME
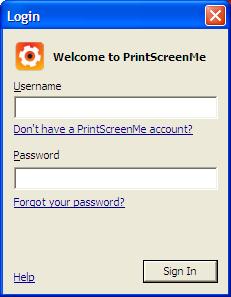
You must first download and install the PrintScreen.ME program, it is available as a free download and works with Windows machines only. Once you install the program and run it, it will prompt you for a user name and password:
You must set up an account over at PrintScreen.ME. Luckily, the only personal information that is asked for is an e-mail. If you don’t want to disclose your e-mail address, however, anything may be entered into the box, as PrintScreen.ME does not require e-mail verification. After creating your account, you will be prompted to enter your account names and passwords for photo sharing sites like Facebook, Flickr, Twitter, etc.
The entire setup process takes less than 2 minutes. Once the program is installed, an icon should appear in the lower right (this screenshot was created with PrintScreen.ME):
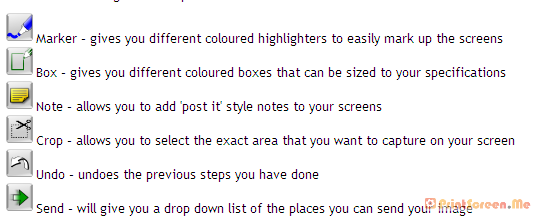
Now, upon pressing the PrintScreen button you will be able to use PrintScreen.ME to edit and upload your screenshots. Here is a more detailed breakdown of PrintScreen.ME’s annotation features:
The verdict?
PrintScreen.ME is an extremely easy tool to use and comes in very useful. However, it has one huge drawback which is my reason for removing this program after using it for a day – no dual-screen support. This means that there is no way to capture the image on your second screen. It’s very upsetting that a fairly good program would not support such features, when the standard PrintScreen functionality in Windows camptures multiple monitors without a problem.
An Awesome New Tool for Web Based Webpage Screenshots and Annotations
July 6, 2009 by Victor · 2 Comments
Here at ScreenCaptureNews, when it comes to software, we like everything that’s free, useful, and simple. A good example of an application that abides by those three rules would be Aviary. Think of Aviary as a tool for capturing screenshots of webpages, similar to FireShot, which we earlier reviewed.
How it works
The way it works is quite simple, just place www.aviary.com/ before the URL of the webpage that you would like to capture.
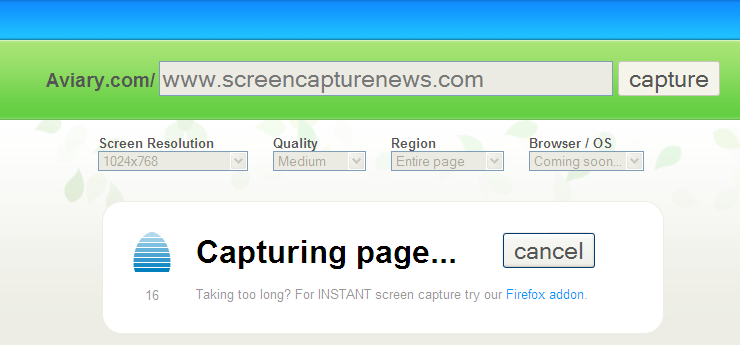
Once that is done, you will be taken to a loading page, it means that your capture was successful and the Aviary image editor is starting.
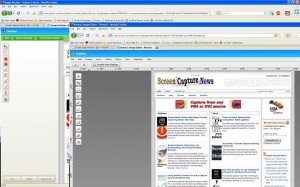
You will then be taken to a full-blown image editor, as pictured below. The features are pretty self explanatory. Once you are done editing, you may click on “save to desktop” or “save & host online,” depending on what you would like to do with your saved capture.
Advanced Screenshot Editor
The most amazing feature of Aviary is, by far, the advanced editor, pictured below. It can be accessed by clicking on “Advanced Editor” in the top right of the window.
Those that work with Photoshop will have an easy time adapting to the advanced image editor, which tries to replicate the Photoshop interface and functions with some features like layers, history, magic wand, smudge tool, liquify tool, freeform selection tool, and more. All these features definitely make this web based applet more advanced than most free screenshot editors which need to be installed. What’s more, Aviary works with all operating systems including Windows, Mac OS and Linux, and allows for direct uploading of an image to the Aviary web servers, where you can share it with others.
Conclusion
If you don’t have a webpage screenshot editing tool that you’re used to, or if you’re looking to try something new, I would definitely recommend Aviary. It’s easy to use, it’s free, and it’s packed with features that you won’t find anywhere else!
ScreenCastle Makes Web-Based Screen Capturing Easier Than Easy
A good amount of free web-based screen capture solutions exist today, many of which we regularily review on this site. Today, however, ScreenCastle a new web-based video capture solution came to my attention.
ScreenCastle is by far the easiest web based applet I’ve used, and it really holds true to its “One Click Screencasting” philosophy. ScreenCastle brings the following features to its users:
- 100% free
- It is possible to record fullscreen or to choose the part of the screen to record
- Unlimited fullscreen resolution recording.
- Audio recording (from primary audio recording device such as computer mic)
- Unlimited video length
- Unlimited maximum number of videos
- No registration
Features like unlimited resolution, length, and number of videos truly make this applet stand out from the crowd. There is also an API provided for developers who would like to integrate this technology into their own websites and applications.
Using ScreenCastle
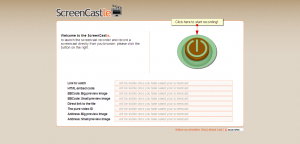
As soon as you open screencastle.com, you will see the huge red button to the right. That is what needs to be clicked in order to begin the screen capture.
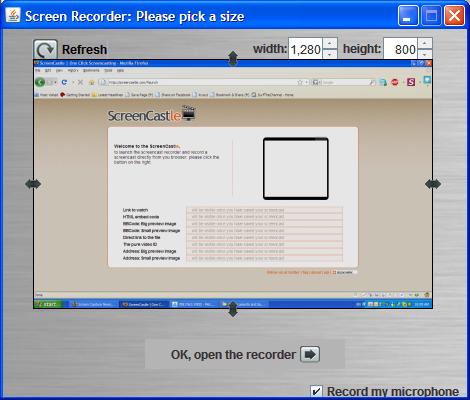
After you click the button, a security warning comes up, you must accept it for the recording to work, as ScreenCastle needs to gain access to your computer. After that, ScreenCastle lets you choose if you would like to record your entire screen or just a part of it. You are also able to record from your mic by ticking the checkbox in the lower bottom of the window. Once you are finished configuring the recorder, the arrow at the bottom must be selected.
You will now see a black bar at the top of your screen. Click on “start recording” for the recording to start, and then go back to the top of the screen and select “stop recording,” then “save” in order to save your video. This is where I was disappoined. I attempted to record a minute of HD video and even though it was recorded, the video was unable to proccess, thus making ScreenCastle not all that it is made out to be.
I then went ahead an recorded some simple internet browsing with some standard definition YouTube video (near the end of the video). That didn’t work either. I tried recording 10sec of browsing a text webpage, and although it did get to the uploading step, the video never actually proccessed. I am assuming this is a temporary problem with the site and will be fixed. Once it is, samples of video recordings will be added.
Finally, assuming the uploading and processing does work, ScreenCastle gives you several ways to share your video:
- Link to watch (YouTube-like streaming Flash video)
- HTML embed code
- BBCode (for posting video to forums and message boards)
- Direct link to media file
- Preview images (for linking to video)
Conclusion
ScreenCastle is a great idea, is easy to operate, and seems to work smoothly until you get to the final step. No matter what scenarios and resolutions were thrown at it, ScreenCastle would not let me upload any of my recordings. As such, ScreenCastle’s video recording quality cannot really be judged until that bug is fixed.
Screen Capture, Recording, and Broadcasting with Windows Media Encoder
Do you want to use your frame grabber, screen grabber or webcam with Windows Media Encoder to record or broadcast video? If yes, then this article will help you understand the ins and outs of working with Windows Media Encoder 9 Series and get the most out of this valuable tool.
Windows Media Encoder may be downloaded free of charge at the following address: http://www.microsoft.com/windows/windowsmedia/forpros/encoder/default.mspx. The software may be used with Windows 2000, Windows XP, and Windows Vista.
In this article, a simple VGA frame grabber, the VGA2USB, will be used to broadcast and record the screen of another computer.
Configuring Windows Media Encoder (WM Encoder) for VGA or DVI Broadcast and Recording
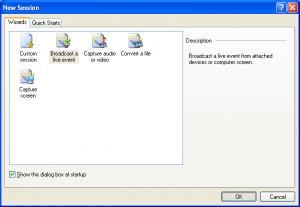
1. Open WM Encoder. The new session wizard should immediately appear. If you would like to broadcast AND record/archive at the same time or just broadcast the VGA or DVI output, select “Broadcast a live event”. If you would to record without broadcasting, select “Capture video or audio”. Click on OK.
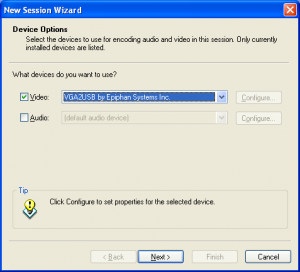
2. You will now be brought to a screen within which you can select whether you would like to record video and/or audio, and from which devices. In this example, we will record just the video output from the Epiphan Systems VGA2USB, which is a low-cost external USB frame grabber. If the frame grabber is connected but not appearing in “video” list of devices, it may be because it does not support 3rd party software or the drivers are not installed properly.
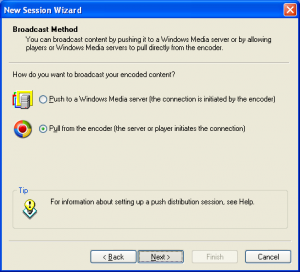
3. Now that you’ve configured which devices you’d like to capture from, the network and connection settings must be selected. In the Broadcast Method step, you must indicate whether you are planning to use an external Windows Media Server to broadcast your video, or if you want to simply use your computer. For simplicity, we will use our own computer. Thus, “pull from encoder” must be selected.
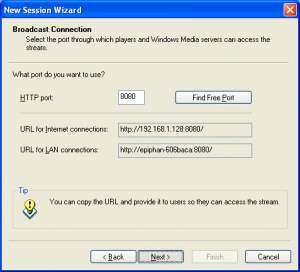
4. You must now select the network port that your broadcast is going to be sent through. If you are not sure which ports are free on your computer, simply click on “Find Free Port”. VERY IMPORTANT: Write down the 2 URLs that are given to you in this step. You will need them later in order to give to your viewers so that they can access the webcast.
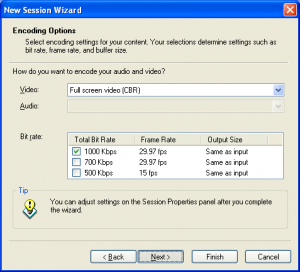
5. Now you need to select the bandwidth/quality for your webcast. This depends on how much of your internet connection you want to consume for the webcast, but 700Kbps+ seems to be the norm these days for average quality video.
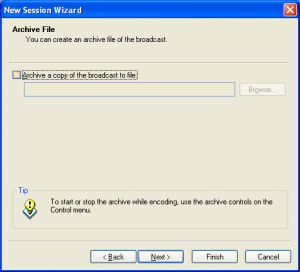
6. In the Archive File step, you may select a location on your local hard drive to save the broadcast to. That way, you may access it (and even re-broadcast it) at any time after the original broadcast has been made.
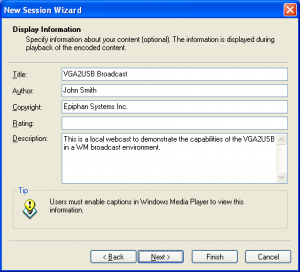
7. Here, you may put some details and copyright information about your broadcast. Your viewers will be able to see this information as it will appear if they click on “file properties” from their media player.
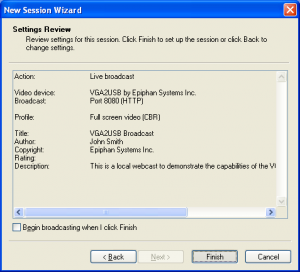
8. That’s it! You have now configured your first Windows Media Encoder VGA or DVI broadcast! Click on “Finish” to complete the wizard.
FAQ
How can my viewers open my webcast?
Your viewers can find your webcast by going to the address that was provided for you in step 4.
I gave the address to my viewers but they still cannot access the broadcast.
Are you behind a local firewall, switch or router? Disable any firewalls that might be blocking the communication between you and the client machine. If you are on a home/business network and want to broadcast to the Internet or outside of your LAN, then you must setup port forwarding to your computer on the router. This is done by going into the router’s control panel and forwarding the HTTP port provided in step 4 to your machine.
My video has both high frame rate and bandwidth settings, but is still not of sufficient quality.
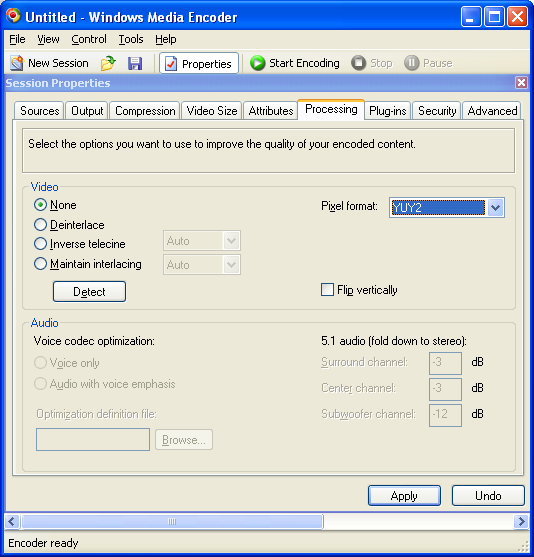
You might have to modify the video processing options. Stop your recording and click on the “Properties” button that is located at the top of the main WM Encoder window. From there, navigate over to the “Processing” tab and select “YUY2″ as the pixel format.
Using Adobe Connect Pro and a Capture Card to Broadcast VGA
February 24, 2009 by Victor · Leave a Comment
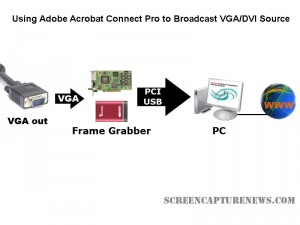
What makes software packages like Adobe Connect Pro, Cisco WebEx, and Microsoft Live Meeting useful is the ability to broadcast anything that is visible on the computer screen as long as you have one of these applications installed and running. However, there are situations where one cannot install a web collaboration/presentation software on a computer but still needs to broadcast the image from it. It is also possible that you are using a device or operating system that is incompatible with your favorite webcasting software. Perhaps you would like to broadcast from a document camera pod with a VGA or DVI interface.
Some situations where an external frame grabber is useful:
- When a network connection is lost, the presenters screen is still being recorded.
- There are not enough system resources to run Connect Pro, or the computer does not allow the installation of Adobe Connect Pro.
- Switching layouts- Once a layout has been switched, the computer sharing the screen in the previous layout needs to be activated again.
- Audio – When working with demos, the demo machine’s audio needs to have the Connect Pro audio installed, but muted (through the voice and camera pod) otherwise the session’s audio will echo.
- Bandwidth – Each demo computer needs to be logged into the Connect Pro meeting. When many computers/devices are connected to a Connect Pro meeting, too much bandwidth is “eaten up”.
- Unsupported devices – Since Adobe Connect Pro is normally only compatible with Windows and Mac OS X, adding a frame grabber allows you to use Connect Pro on any device with a VGA or DVI port.
source: www.connectusers.com
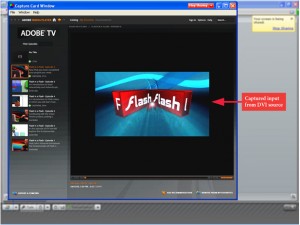
In order to accomplish this, you would need to use a frame grabber connected to a Connect Pro capture computer. You would then launch the application that comes with the grabber on the computer with the VGA grabber and share it with Connect Pro. As long as the VGA source is connected to the grabber itself, then you’re ready to broadcast the image from it!
What frame grabber works best with Adobe Connect Pro?
There is no universal answer to this question and it really depends on what your capturing needs are. If you are looking for something cost-effective and do not need to broadcast an image with as lot of movement, then the Epiphan Systems VGA2USB will be enough. However, if you need to broadcast an HD or other high-quality imagery, then we suggest to look into the NCast DCC3.1, Epiphan VGA2Ethernet, or DVI2USB Duo.
For a detailed comparison and description of the most advanced high-resolution frame grabbers on the market, please refer to our frame grabber comparison table.
Free Application + Source Code for Capturing Screenshots in Windows Mobile 5
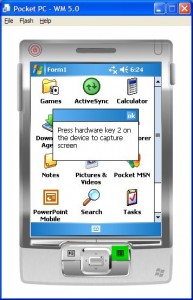
Don’t you ever wish that your PocketPC had a dedicated “Print Screen” button? Unfortunately, screen capture is not present in Windows Mobile 5 and most screen capture applications are not free. Screener, an entirely free Windows Mobile 5 application that weighs in at under 20KB, captures the screen of your PocketPC device and saves it as a .JPG file in your root folder.
In order to take the screenshot, you must first figure out which hardware button on your PocketPC is assigned to the Screener application (it is usually button #2). Then you simply press that button, after which the capture of your screen is saved to your root folder. Simple as that!


