New Web-Based Screen Capture Utility Now in Beta
October 27, 2008 by Victor · 3 Comments
Here at ScreenCaptureNews, we like all things that are simple to use and don’t cost an arm and a leg. ScreenToaster is a completely free exciting new web-based Java applet similar to ScreenCast-O-Matic. You can read our full review of ScreenCast-O-Matic here. While ScreenCast-O-Matic was an easy applet to use, we did find some problems, notably the ultra-low capture rate (~2fps), that took away from the usefulness of this application.
ScreenToaster is basically an online applet that records your screen or an area of your screen and then instantly publishes the recording to the web in Flash YouTube-like format for you to share with your peers or co-workers. This can come in extremely useful in situations where you need to demonstrate to someone how to use a piece of software, create instructional videos, or upload a video of your screen for others to see for troubleshooting purposes.
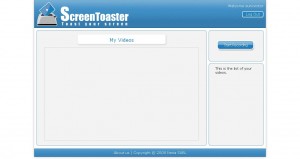
While ScreenToaster is still in Beta, you will need an activation key to use it. The activation key can be requested by going to the registration page of the ScreenToaster website. Once you have registered your user account and logged in, ScreenToaster will bring you to your control panel. From here, you will need to press “Start Recording” to launch the recording proccess. You will also be prompted to install the ScreenToaster Java applet, which you must accept.
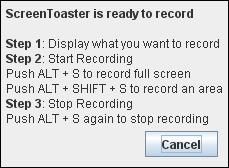
Once you have clicked on “Start Recording,” ScreenToaster will display a small info box which explains how the software works. It is rediculously easy to understand and use. First, you must bring forward the application which you would like to record. Then, pressing “ALT + S” begins a recording of your entire screen, whereas “ALT + SHIFT + S” allows you to select an area of your screen to record. Finally, once you are done recording, “ALT + S” must be pressed again in order to publish the video.
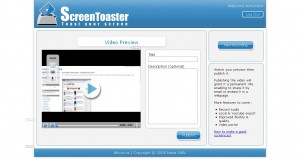
Once you have finished recording (after pressing ALT – S), you will be taken back to the ScreenToaster control panel where you’ll be able to see your recording.
Using the three options on the left side of the video preview, you can add subtitles, audio, or change the preview shot of the video.
You must now name and describe your video. When you are done, click on “Publish”
Unfortunately, we at ScreenCaptureNews were unable to publish any videos due to the fact that it gave us an error every time that we hit “Publish”. The developers of the software wrote to us and said that, because the software is still in beta, bugs do pop up from time to time.
What we saw in the preview, however, was fairly decent. The frame rate was pretty good and it even recorded a video off of YouTube at about 20fps, which is a ten-fold difference between ScreenCast-O-Matic. ScreenToaster was also exceptionally easy to use and overall is a promising web applet.
The developers of ScreenToaster claim that the application works with Windows, Mac OS X, and Linux. ScreenToaster will always be free and will most likely be ad-supported once it is released to the general public. Tentative release date, according to ScreenToaster staff, is “end of October”. We’ll keep you posted with a full review once ScreenToaster is out of beta.
A Brilliant Way to Quote
October 15, 2008 by Victor · Leave a Comment
How often have you wanted to quickly grab a screenshot of a webpage and post it online, publish it to a forum, e-mail it to your friends, or just save it to your computer? Of course, all these tasks are easily accomplished by complicated programs or browser add-ons, but what if you could do all that without ever actually installing anything?
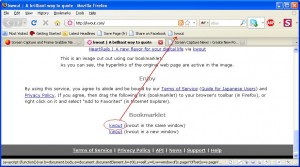
This is where Kwout (pronounced like “quote”) comes in. Kwout is what is called a bookmarklet and is launched simply by adding the link provided to your bookmarks and then launching the bookmark. For convenient use, you can drag the link directly onto your toolbar, as shown below.
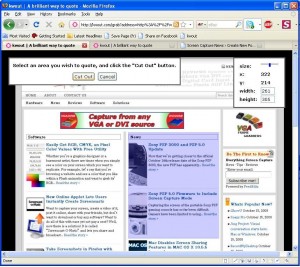
That’s it! You can now take screenshots of webpages, images on webpages, and even save text with links by going to the bookmark that you just added. When you see something on a website that you would like to save, simply click on the bookmark and follow the easy to use proccess. First, you will have to select the area of the webpage that you want to capture and click on “Cut Out”.
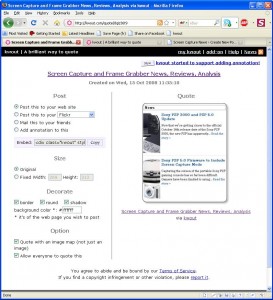
You will now be shown your captured area. At this point, you can customize the way it looks, add annotations, and select where to post it. You can copy/paste the HTML code given to put it directly on your site or blog, you can e-mail it to your friends, or post it to one of these photo-sharing and content sharing sites:
- Flickr
- Tumblr
- Blogger
- Vox
- sa.yona.la
- Livedoor Blog
- Ameba Blog
- Hatena Diary
- Excite Blog
- Cocolog
- So-net Blog
That’s it! You have now posted an exceprt/screenshot from another webpage! Keep this tool in your bookmarks, it’s easy to use and absolutely free. You never know when it could come in handy.
Source: http://www.kwout.com/
Sony PSP 3000 and PSP 5.0 Update
October 8, 2008 by Victor · 11 Comments
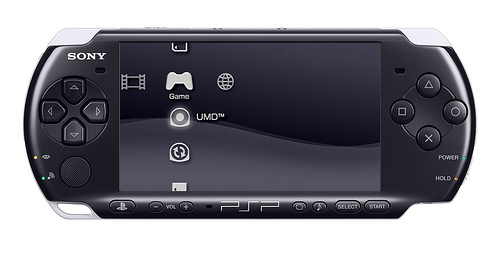
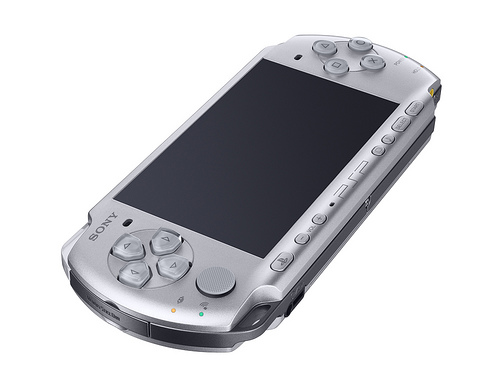
Now that we’re getting closer to the official October 14th release date of the Sony PSP 3000, the new PSP has apparently been popping up all over Best Buy stores in the US. Here is a picture of the new PSP 3000, packed with the Ratchet and Clank: Size Matters bundle.
If you’re lucky enough to convince the sales rep to sell it to you (they aren’t supposed to sell them before the 14th, but some do anyways), then you will find, besides the actual console, game, cables, instruction manuals, a 1GB memory card. It is surprising that Sony didn’t include a 4GB card, but it seems like they’ll be selling the PSPs with 4GB memory sticks once the 1GB cards run out.
Sony PSP 5.0 Firmware Update
The new Sony PSP 5.0 firmware update will include the following features:
- PSN (PlayStation Network) Access. This means that gamers will now be able to use the PSP for multiplayer online games. Most new releases will now have full multiplayer support, with possible access to the PlayStation Store. Users will also be able to chat with eachother directly through their PSPs.
- RSS Reader. While there is an RSS reader in the current release of the firmware, it is quite buggy and is not easy to use. The new RSS reader will be completely redesigned to address all of the features which Sony has received complaints about. The new RSS reader, besides having support for images and videos, will also have support for text.
- Screenshot mode. Users will now be able to take screenshots of their in-game action, which was something impossible with the previous firmware revisions. The screen captures will then be saved to the Memory Stick. Most likely, full support for screen captures will only be available in newly released games.
PSP 3000 Hardware
So you now know about the new firmware. Now, let’s see what’s new on the hardware side of the PSP 3000, and is it really much better than the PSP 2000?
The new PSP has a more refined look than the PSP-2000. Sony has also done a lot of research in the ergonomics of the device, which have also been improved. Some of the ports on the PSP have been moved around to provide easier and better connectivity. The TV-out feature has also been improved to support TVs without progressive scan, whereas only progressive scan TVs were able to function with previous hardware version of the PSP.
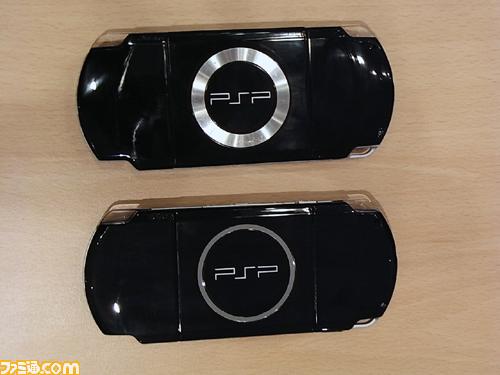
Sony has also decided to add an integrated microphone to the PSP 3000, located just below the LCD screen. This feature would be very welcomed by those who use Skype on the PSP. It would even allow future games to support in-game voice chat (similar to TeamSpeak on PC). The rear (back) panel has also been refined for a different look, pictured below.
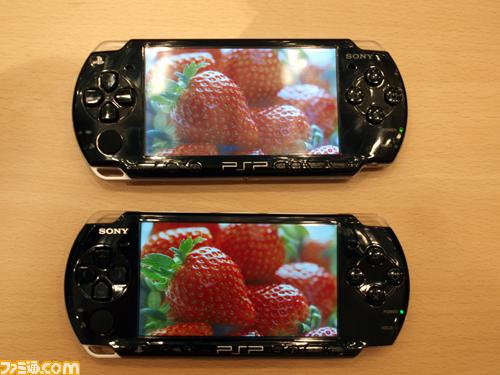
The biggest hardware improvement, however, is the new LCD screen. This really is a feature worth switching to the PSP 3000 for. This screen is probably the crispest and brightest of any portable video game console available on the market. The PSP 2000 is pictured above, while the PSP 3000 is at the bottom of the picture. Check it out:
For those users who absolutely need to know the specs of the new PSP 3000, Sony has announced the official specifications, shown below.
Sony PSP 3000 (PlayStation Portable) Specifications
Size: 169.4 x 18.6 71.4 mm / 6¾ x ¾ x 2¾ in
Weight: 189g / 6.7oz (with the installed battery)
CPU: System clock frequency 1-333MHz
Main Memory: 64MB
Display: 4.3 inches (16:9) full-transparent type, 480×272 pixel, 16,770,000 colors
Sound: Built-in stereo speakers
Main input/output: Wireless LAN (IEEE 802.11b) (Wi-Fi)
High Speed USB (USB2.0) (mini-B)
Memory Stick PRO Duo™
Analog Video Out
Microphone
Main connectors: DC IN 5V connector; DC OUT connector; Video out/headset connector; USB connector
Memory Stick Duo™ slot
Power sources: Lithium-Ion rechargeable battery pack
AC adaptor
USB power supply
Internal disc drive: Read-only UMD™ drive
Access control: Region code, parental control
Ad hoc mode (connects up to 16 consoles)
Supplied accessories: AC adaptor
Battery pack (1200mAh)
The verdict? Two thumbs up from us! Sony really did listen to gamers’ views on the old PSP and has added some cool and, more importantly, useful features to make the PSP experience even better than before! If you’re still considering buying a PSP, then the PSP 3000 is the one to get!
More links/sources: Sony Official Press Release, QJ.net, Walyou.
Sony PSP 5.0 Firmware to Include Screen Capture Mode
October 1, 2008 by Victor · Leave a Comment
Capturing the screen of the portable Sony PSP gaming console has so far been difficult. Gamers have been limited to using the TV-out on their PSPs (PSP-2000 model only) and then using a TV capture card on a capturing PC. All this is supposed to change with the upcoming release of the next Sony PSP model, PSP-3000. Besides releasing the new device, rumors are that Sony will also offer the 5.0 version of the PSP firmware, which will include things such as direct access to the PlayStation store, better RSS feed integration, and, of course, in-game screen capture.
So, if you want to be able to capture your pocket PSP action but haven’t been able to do so, hold on to your hat. The 5.0 firmware will most likely be released alongside the PSP-3000 model on October 14th in the US and October 19th in Europe.
Source: PocketGamer
Take Screenshots in Firefox with New Add-on
September 30, 2008 by Victor · Leave a Comment
Have you ever wanted to quickly capture a webpage that you are visiting and save the screenshot or send it in an e-mail? What if you need to share your screenshot online with many users (for example, on an online forum)? Maybe you want to create instructions to show users how to navigate a web page and do not want to spend a fortune on special screen capturing and annotating software like Camtasia. If you answered “yes” to any of the previous questions, then this free add-on to Firefox should be something to be looking into.
The FireShot Add-On for FireFox is 100% free and is compatible with Firefox 2 and Firefox 3. It adds the following functionality to your Firefox browser:
- Instantly upload screen captures to FREE public screenshot hosting
– save screenshots to disk (PNG, GIF, JPEG, BMP)
– print screenshot
– copied to clipboard (similar to PrintScreen button)
– Attach screenshot to e-mail
– Annotate and add text and instructions to screenshot
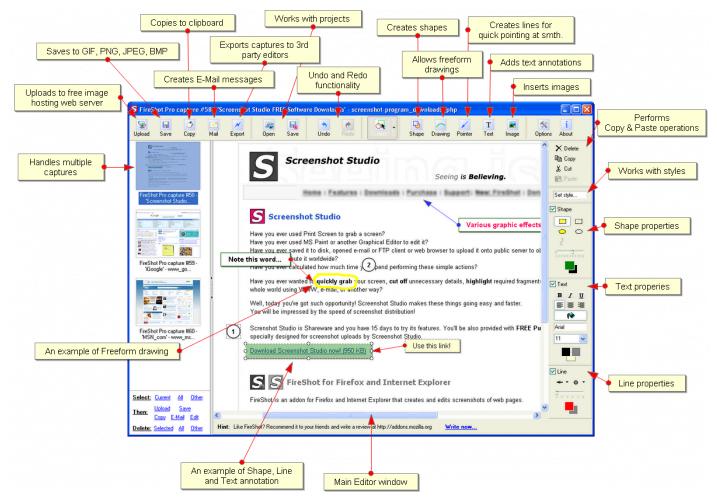
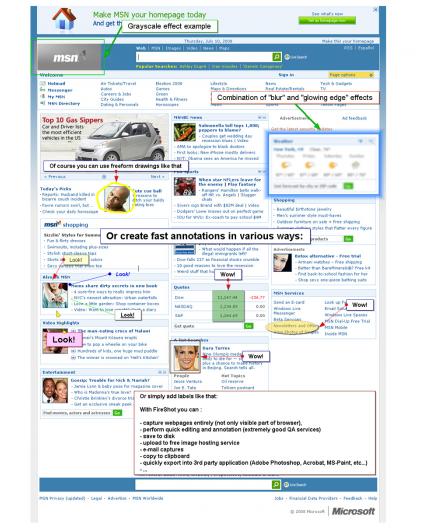
The image above describes the features of the FireShot add-on screen capture editing and annotation tool. As you can see, the add-on has a good array of features and should be sufficient for any sort of simple editing and annotating.
What’s more, FireShot has the ability to add effects to the captured screenshots. This is especially useful if you would like to emphasize a particular section of a webpage or want to hide part of the webpage from the screenshot (if there is a user name or revealed password, for example).
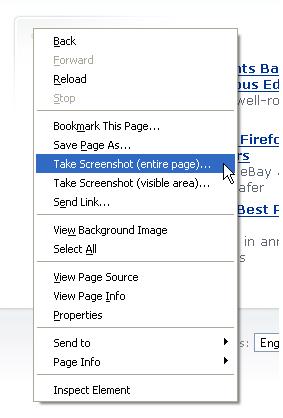
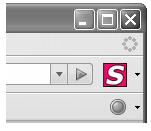
FireShot is accessible both by right-clicking on the webpage that you are browsing or by clicking on the “S” icon beside the address bar.
FireShot can be downloaded here. This add-on is recommended for anyone that regularly needs to take screenshots from their browser or for those that need to create instructional manuals related to the online world.
Apple iPhone Takes Screenshots Without User Consent
 Security experts say they have found a hole in Apple iPhone which automatically takes a screenshot every time that you press the “Home” button, and that the images made can be retreived later. Of course, these screenshots are taken without the user’s consent and knowledge. This “feature” is not to be confused with the iPhone’s actual screenshot feature, which archives an image of the screen to the iPhone’s memory whenever you hold down the power/sleep button and push the Home button.
Apparently, the iPhone takes a screenshot every time you press the Home button in order to create the shirinking effect of the application window that was open when the button was pressed, bringing some insight into the way that the iPhone OS works. The iPhone is supposed to remove the screen capture file after the effect has been created. Nevertheless, the screenshots can be retrieved with special software that can analyze the memory of the iPhone for deleted files.
Jonathan Zdziarski, the security expert that discovered the flaw, said that this hole has been used by forensic experts to “gather evidence against criminals convicted of rape, murder or drug deals.”
While most people have nothing to worry about, this issue raises a privacy concern for those that do things on their iPhone that they wouldn’t want others to discover should the phone end up in the wrong person’s hands.
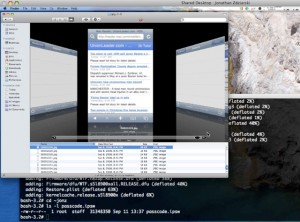
Screenshots, like the one above, are captured by the iPhone every time that the “Home” button is pressed by the user.
Read original article here: source.
Emulate a screen capture card on your computer… for free!
September 2, 2008 by Victor · Leave a Comment
Have you ever wanted to use your video capture software of choice for creating screen captures, broadcasting live from your screen, or creating videos? Are you a software developer that would like to integrate screen capture into your software package? If your answer to one of these questions is “yes” then we have a solution for you… for free!
The solution is to use a free tiny (<1MB) utility called VH Screen Capture Driver by Hmelyoff Labs. VH Screen Capture driver works by emulating a video capture card in your Windows system, with the output being that of your local monitor. Think of it as a software-based frame grabber that works on Windows machines only. However, do not think of this software as complete replacement to frame grabbers, as it has many major disadvantages over its’ hardware counterparts.
First of all, the screen capture driver uses up a vast amount of system resources, meaning that more advanced applications will not have good capture quality, whereas a frame grabber uses its’ own resources only and puts no extra load on the system. The VH Screen Capture Driver is also only compatible with Windows machines and, being a DirectShow filter, will not work with all applications. A frame grabber however, is compatible with any VGA or DVI output, whether it be from a MAC, Windows machine, high-resolution navigational equipment, etc. Thus, VH Screen Capture is good as a free solution but in no way can this software match all of the advantages that frame grabbers entail.
Technically, however, VH Screen Capture Driver is a DirectShow filter and is compatible with applications that use DirectShow to display content on the user’s screen. The output frame rate does depend on which application is being captured and the system load.
In short, VH Screen Capture Driver allows the user to use popular video capture and broadcast applications, such as Windows Media Encoder and Adobe Premiere, without native screen capture support to grab the image off of their screen.
Using VH Screen Capture Driver
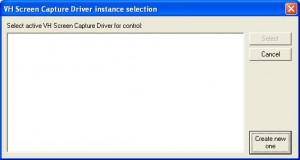
Step 1: Install the program and run it. You should immediately see the following screen. Press “create new one” to start a new instance of the capture driver.
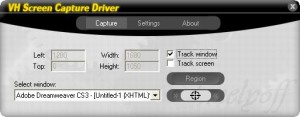
Step 2: You will now see a configuration window. Under the “Capture” tab, you may choose the “Region” option and select only a region of the screen to broadcast. Ticking the “Track window” option enables you to broadcast a single application. You may select it by choosing it from the drop-down list or by clicking on the crosshairs beside the drop-down list and then selecting the application.
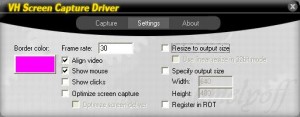
Step 3: Now select the “Settings” tab. Here you can adjust the maximum output frame rate, whether to show your cursor, or whether to compress the screen capture output. If you would like to resize your output in real time, the “Resize to output size” option must be ticked and the output size (Width/Height boxes) must be specified. This is most useful when you are broadcasting to the web and would like to limit the output video resolution in order to use less bandwidth or obtain a smaller file size.
Congratulations! The VH Screen Capture Driver is now configured. Now go to your video capture application of choice, select the “VH Screen Capture Driver” as an input, and start capturing!
Screen Capture Trojans Penetrate Bank Security
August 12, 2008 by Victor · Leave a Comment
 In hopes of fighting Internet fraud, some online banking sites make customers use “virtual keypads” — a method of entering passwords on the screen, generally with a mouse.The system is designed to thwart keystroke-logging programs that capture everything a user types. Now those virtual keypads appear just as vulnerable to snoops.
A Spanish security company, Hispasec Systems, has revealed details of “Trojan horse” programs that can capture video imagery of an unsuspecting person’s computer use. If the user enters a PIN on a bank’s virtual keypad, the dastardly program is a witness.
Like most Trojan horses, the ones detected by Hispasec are slipped onto users’ computers when they visit certain Web sites, often through spam links, said Hispasec researcher Bernardo Quintero. Often, users have no clue if they were hit. When Quintero’s group tested whether more than 30 anti-virus programs would block a recent video-logging Trojan, only six did so.
Gartner Inc. security analyst Avivah Litan said screen-capture programs that attacked virtual keypads emerged as early as 2003, when banks in Brazil fell prey. She said the technique has remained relatively rare because the programs consume a lot of bandwidth and storage, and there have tended to be a lot of easier targets.
But that may be changing. Quintero said Wednesday that a newly detected Trojan combines keystroke-logging and video-capture functions — and instead of recording the entire screen, the program just grabs images of the immediate area near where the user clicks the mouse. The spy receives a smaller file, making the attack easier to pull off.
All this points to an enduring security truth: No single measure — especially one that is apparent to fraud artists — is likely to guarantee safety.
Litan says banks would be wise to focus more resources on behind-the-scenes software that can analyze Web banking sessions to gauge their legitimacy.
“Banks should stop implementing patchwork solutions and get it right the first time,” she said.
source: The Associated Press
Capturing screenshots and data from Garmin GPS devices
August 12, 2008 by Victor · 5 Comments
 The market of navigational products is cluttered with a multitude of manufacturers, solutions, and products. Historically, Garmin came out as one of the most popular manufacturers of portable handheld GPS devices.
While industrial and military consumers tend to use high resolution frame grabbers in order to capture the screen from advanced GPS devices with VGA outputs, this is not an option for those users that have small personal GPS receivers.
There are several ways to capture the screen of a Garmin GPS device for free:
- Using xImage software supplied by Garmin. (last update in 2005)
- Using G7ToWin software developed by Ron Henderson. (last update in 2008)
- Using the DNR Garmin application written by the Minnesota Department of Natural Resources. (last update in 2008)
Due to the fact that there are a lot of different Garmin GPS models, not all software programs will work with all Garmin devices. The G7ToWin application also has limited functionality with Magellan GPS receivers. All of the software packages listed above are available as free downloads.
xImage
Installation of the xImage software is easy. Download the last release from here, launch the file, and follow the on-screen instructions. You can the launch the xImage application from the Garmin submenu in the Windows Start Menu. The GPS must then be connected via USB or serial port for the software to be able to locate it.
Follow these instructions in order to capture a screenshot from your Garmin GPS device. Remember that the GPS must be connected to the capturing computer at the time of the screen capture.
1. Connect your device to your computer. Verify that you have selected the ‘Garmin’ I/O format on your GPS unit. See your GPS unit’s owner’s manual for more information.
2. Open xImage and click Next.
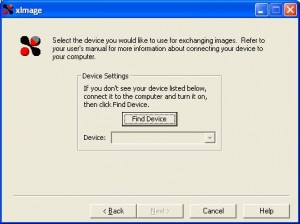
3. After a few moments, your device should be listed in the Device Settings window. If not, click Find Device. xImage finds the connected device. If you have multiple devices connected to your PC, select the desired device from the drop down list.
4. Click Next.
5. Select Get images from the GPS, then click Next.
6. Select ‘Screen Shot’ in the Image Type field.
7. Verify that the desired screen is currently displayed on your GPS.
8. Click Next.
9. Select the desired location on your PC, enter a file name for the screen shot, and click Save. The screen shot is saved as a .bmp file on your PC. xImage displays a preview of the screen shot.
10. Click Finish to close xImage.
NOTE: You can also click Back to return to a previous screen and perform additional tasks.
G7ToWin
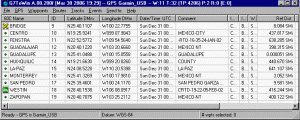
Download G7ToWin from here and install by following the prompts. Once the software is installed and your GPS device is connected, the G7ToWin software will bring you to a main screen that displays all of the waypoints saved in the GPS.
From here, the “Get and Show Display Bitmap” option must be selected from the GPS menu. This takes a screenshot of what is currently being shown on the GPS and saves it to the local hard drive. As well, the Ctrl+D keystroke combination may be pressed to grab the GPS’ screen at any time.
DNR Garmin
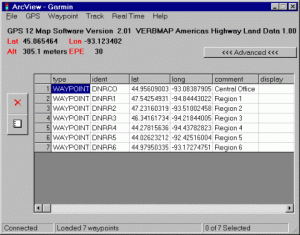
DNR Garmin may be downloaded from here. This application was created by the Minnesota Department of Natural Resources for their internal use, but the department also released the software to the public as a free download. This software is designed for power users and has many advanced functions.
Once the software is instalelled and the GPS receiver is synchronized with the DNR Garmin software, taking a screenshot is as easy as going to the GPS menu, and selecting “Garmin Screen Shot”. The program will then prompt you for a location of where to save the screenshot .bmp file.
Conclusion
xImage, G7ToWin, and DNR Garmin are all capable of saving the contents of the Garmin GPS’ screen to a BMP file on the computer the GPS is connected to, whether it be through a USB or serial port. Note that it is not possible to capture a screenshot of the GPS device when it is not connected to a computer on which one of these software packages is installed.
Using this software, there is also no way to automate the capture proccess or have the GPS screen’s output captured as a movie. This would be useful for archiving or creating instructional videos, for example. If real-time and automated screen capture is required, then a device with a VGA or DVI output coupled with one of these frame grabbers would allow the user to have that functionality.
Online applet allows users to share their screens for free
The market is full of applications designed to share, webcast, or broadcast a user’s computer screen over the web. What separates this application apart from the competition is that it’s a web-based applet. Vyew (pronounced “view”) is compatible with all recent browsers (Internet Explorer, Firefox, Safari etc) and platforms (Windows, Mac or Linux). All that the user needs in order to use this application is Java and Flash installed on their PC.
Vyew is a great altenative to programs like PCAnywhere, TightVNC, that require you to install software on the source and target computers. What’s more, the free version of Vyew does not require you to sign in to the website, allowing the user to initiate the entire desktop sharing proccess in a matter of seconds.
Usability
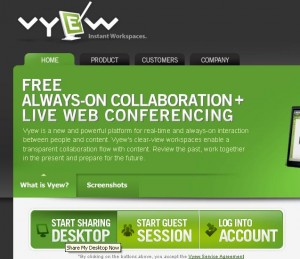
Operation of the Vyew applet is extremely simple. Start by going to Vyew.com. From there, click on “Start Sharing Desktop.”
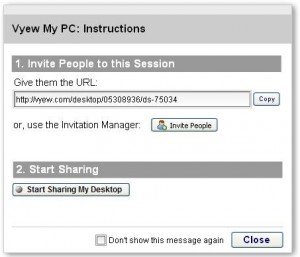
Save the URL that is given to you and give it to all those that you would like to share your screen with. This is the address that your viewers will use in order to log into your Vyew session. Now click on “start sharing my desktop”.
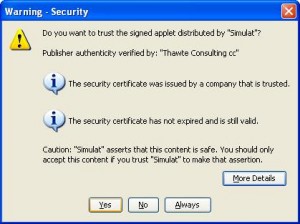
You will get a warning for allowing the applet access to your computer. Press “Yes”.
Now when any of your viewers enter the URL that was supplied to you before the webcast was started, they will see everything that you are doing on your desktop in real time. The viewers can chat with the broadcaster by clicking on the little tab visible on the left side of their screen.
Quality
Vyew tracks the cursor of the source machine, and this is the reason why all cursor movements are very fast and accurate. The free version of Vyew is only able to perform screen capture at a rate of about 1-2 frames per second, thus everything on the screen of the viewer is visibly slow. The person sharing must always rembember this and avoid doing things so fast that the Vyew refresh rate cannot keep up.
The resolution, picture quality, and sharpness in Vyew is very good. Even fine print is perfectly readable and all images are still fairly sharp.
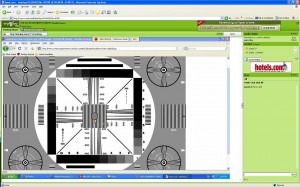
Here you can see a resolution chart that was broadcast to a remote user through Vyew. It is still sharp and retains most of its’ quality. This is great for not just general remote desktop sharing, but also showing presentations, spreadsheets, and Word documents.
Conclusion
Overall, Vyew is a pretty impressive web-based application. There are no intrusive advertisements on the Vyew website, which is another pleasant surprise for a free service like this. There is only a small banner ad in the top right corner. All of the free screen sharing sessions go through the Vyew servers over an unencrypted connection and do not offer the user any options to protect their content. Simulat, the company that makes this applet, hopes that some users will subscribe to their pay service, which offers features like encryption, voice and webcam broadcasting, advanced teleconferencing, and archiving.
While it is unfortunate that more advanced features like audio sharing were not included in the free version and that the refresh rate is so slow that only static pictures and text can be broadcast, the functionality and ease of use of Vyew is still pretty impressive for a completely free service. This applet is perfect for those that need to share their desktop only once in a while and without any hassles.


